♻️ Turn kitchen chaos into clean convenience with Waste King!
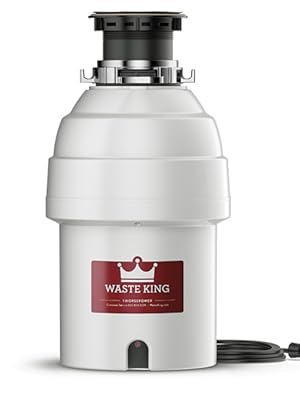
The Waste King L-8000 is a powerful 1 HP garbage disposal featuring a 2800 RPM permanent magnet motor designed for quiet, jam-resistant operation. Its EZ Mount system allows for fast, tool-free installation without electrical expertise. Constructed with durable stainless steel grinding components and backed by a 20-year limited warranty, this compact disposer offers continuous feed functionality and easy cleaning with a removable splashguard.


| Manufacturer | Waste King |
| Part Number | L-8000 |
| Item Weight | 11.94 pounds |
| Product Dimensions | 8.5 x 8.5 x 16 inches |
| Country of Origin | China |
| Item model number | L-8000 |
| Is Discontinued By Manufacturer | No |
| Size | 1 HP - Continuous Feed |
| Style | Disposal Only |
| Finish | stainless |
| Material | stainless steel | corrosion proof polymer |
| Pattern | 20 Year Warranty |
| Voltage | 115 Volts |
| Horsepower | 1 hp |
| Item Package Quantity | 1 |
| Special Features | Lightweight |
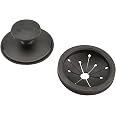
| Included Components | Splash guard, Reset button, Power cord, Mounting assembly, Disposal, Sink Flange, Drain stopper, Drain Elbow |
| Batteries Included? | No |
| Batteries Required? | No |
| Warranty Description | 20 Year Warranty |
C**S
excellent, easy installation
The seller was Amazon. I purchased it new for 127 bucks in October 2013.The Waste King L-8000 replaces a disposal that came with my home. The old disposal was a SinkGuard SE150 1/3 Horsepower. It lasted 7.5 years before it began to seize-up due to rust and bad bearings. The old unit had the 3-bolt connection, which I completely removed. The EZ mount system that came with the Waste King was all I needed.It took me about 1.5 hours to get the old disposal out and to install the Waste King. Reading the reviews on Amazon was very helpful. It was good to know that this was a do-it-yourself job.My sink is fairly basic: Just one big sink with one drain.Everything that I needed came with the Waste King. I reused the gasket that was part of my old discharge elbow (slipped it off the old discharge elbow and onto the new discharge elbow that came with the Waste King...it helps to make a tight seal between the discharge elbow and the plumbing).The instructions were well written. I followed them closely. Here are some things to note:REMOVING THE OLD DISPOSALThe instructions talk about removing the old disposal completely, and then in the next section they talk about removing the dishwasher connection. When removing the old disposal, just be sure to remove all things attached to it before removing the old unit itself.SUPPORTING THE UNITWhether removing the old unit or installing the new one, I placed folded towels under the unit to hold it in place; this kept the unit from falling or tipping over. Folded towels worked well for me, since I could adjust the height of the support easily.FINAL TOUCHESI secured the discharge elbow loosely to the unit using the provided plate and screws.Then I inserted the discharge elbow into my plumbing (with folded towels supporting the unit).Then I tightened the mounting ring enough to support the unit.Then I tightened the discharge elbow to the unit.Then I tightened the discharge elbow to the plumbing.Then I plugged the dishwasher drain into the unit and tightened it.Finally, still with the folded towels supporting the unit, I tightened the mounting ring completely.I did not need a hammer to tightened the ring completely; I was able to tighten it completely using my hand.I found it was important to keep the unit supported while tightening the mounting ring completely, because I accidentally turned the ring the wrong way (but not enough for the unit to come-off). If the support wasn't there when I accidentally turned the ring the wrong way (and if the unit came off), then it would have placed strain on the dishwasher and plumbing connections.There were no leaks, thankfully. I ran the dishwasher briefly to make sure it didn't leak either. After flipping the electrical switch, the unit started immediately the first time. No complaints regarding the noise level.When turned-on, the unit sucks water through the splash guard somewhat, but I still had to push some items through the splash guard (like potato peals). So, I trimmed-off half of the small flaps from the splash guard, and now food items fall through the opening much easier. This means that I don't need to force food particles down the drain (I throw big stuff in the trash, so only small items go in the disposal).The Waste King is larger than my old unit, but that was expected since the old unit was only 1/3 Hp and the Waste King is 1 Hp. On Amazon, someone posted a picture of their old InSinkErator Badger 5 next to the Waste King (to show the size difference). The Badger 5 is only 3/4 Hp, so it still makes sense that the Waste King is larger.The Waste King is made in China.WASTE KING versus INSINKERATORWhy did I purchase this Waste King model instead of an InSinkErator model that is made in the USA?Because of the reviews for each brand and the warranties. I wanted something with a lifetime warranty and something that did not rust. Some reviews for InSinkErator mentioned rust and/or units failing right after the warranty. The Waste King L-8000 uses stainless steel parts; it has a lifetime warranty on the unit, including a lifetime corrosion warranty. And the price was right.I'm very pleased with my purchase and the easy installation.
T**M
Excellent disposer and incredible value, but frustrating custom flange compatibility
I moved in to a new home recently and found that the existing disposer was in need of replacement. Instead of replacing just the disposer, I decided to go ahead and completely replace the entire sink, including the faucet, flanges, and disposer. I decided to purchase most of these items on Amazon due to the excellent prices and free Prime shipping. However, I was troubled by the lack of documentation and details regarding the compatibility of the different parts. I'm writing this review along with a review of the disposer flange I purchased in an effort to fill in these gaps for future purchasers.For the disposer, I went with the Waste King L-1001 Legend Series 1/2 HP Continuous Feed Operation Waste Disposer; unfortunately, the flange that comes with the disposer has a highly reflective chrome finish which will not be suitable if you want to coordinate with faucet hardware that isn't also chrome. Though there are many custom flanges to choose from, the Waste King will not be compatible with most of them since it utilizes the EZ Mount system for attaching the disposer to the sink. This assembly is not compatible with the majority of the custom finish disposer flanges found on Amazon and in most other stores; most are intended for Insinkerator (ISE) disposers.There is an adapter kit available (Waste King 3101 ISE Adapter Kit), but I would highly recommend only using this adapter if you are replacing an existing ISE disposer and want to use the hardware already attached to your sink; if you are starting from scratch you would still need to purchace the ISE mounting hardware in addition to the adapter.I should also note that there are some Waste King branded flanges for sale, but the only ones I found that are compatible with the EZ Mount system have plastic finishes, like white, biscuit, etc. Waste King flanges that offer a metal finish are only for Waste King disposers that use the very different 3-bolt mounting system, which are a bit more expensive than the EZ Mount variety.If you plan to start from scratch with all new components as I did, using an EZ Mount disposer along with a suitable disposer flange like the Waste Maid Custom Sink Flange/Stopper Set I eventually purchased will simplify your installation and help you avoid headaches and delays caused by ordering incompatible parts. If you insist on a certain brand of disposer flange you will have to get the flange, ISE mounting hardware, and the adapter. This should work, but at a much higher cost than the Waste Maid flange alone.I won't go into too much detail about the disposer itself; anything I would say has already been posted. It's compact, it's powerful, and it's an excellent value. On top of all that, it's also the quietest disposer I personally have ever used; however, I should note that I've only ever had Badger junk before this and I have it mounted to a very solid and heavy cast iron sink. Your mileage may vary when it comes to noise and vibration if you're using a lighter sink.Installation was a breeze once I had the correct type of flange. Like some others have mentioned, I would recommend installing an outlet under your sink if you were considering rewiring the disposal with an existing connection. Installing an outlet will be easier than replacing the existing cord and will also simplify future replacements/upgrades. Finally, an outlet and box costs less than one dollar, so it's really a no-brainer.In conclusion, I would not hesitate to buy a Waste King again, but I'm pretty confident that I won't even have to for a long time. If you need a new disposer, Waste King is the way to go; just make sure you get the right kind of flange if you don't want to use the stock one.
J**M
Quiet and powerful, not too difficult to install
If you are desperately looking for a new garbage disposal for a DIY installation, do yourself a favor and try this one out! I am not a professional plumber but I could set this up myself.. not without any trouble though. It wasn't this garbage disposal that was giving me the trouble, it was removing the old unit that took me longer than expected. I had a common 3 bolt type disposal and taking it out had me use more force than I anticipated. But eventually I could take it out with the help of the two screwdrivers and a piler. Be careful not to damage your pipes and kitchen sink when you remove your old unit. Be sure to disconnect the pipes first before twisting your old unit out or you could end up damaging the pipes before the installation even begins.Anyway, back to the product review, the instructions were clear, and it fits perfectly into the kitchen sink. It's compact and much thinner than my old unit. The quietness of this machine is impressive, it is so much quieter compared to my old unit. I was provided with all the tools I needed except for one, which is plumber putty, you will need to purchase that to seal the gap between the sink and the disposal to prevent water leaks. You can follow the instructions manual it provided but I would recommend watching the video on YouTube "How to replace a garbage disposal by LRN2DIY" He uses exactly the same brand but just different HP, but instructions are pretty much the same.Highly recommended! If a first time like me can do it, you can too!
TrustPilot
1天前
1 个月前