


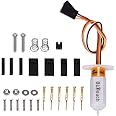
BIGTREETECH BL Touch V3.1 Auto Bed Leveling Sensor Kit for Ender 3 V2/Ender 3/Ender 3 Pro/Ender 3 Max/Ender 5/Pro Compatible with SKR MINI E3 V3.0/Octopus/Manta M4P/5P/8P/V4.2.7 3D Printer Motherboard
描述
🔧 Elevate Your 3D Printing Game!
- EXPERT SUPPORT - Access comprehensive installation guides and responsive customer service for peace of mind.
- EXTENDED STROKE - Experience enhanced performance with a 1.6mm longer stroke than previous models.
- SMART SELF TEST - Stay worry-free with built-in self-diagnostic features that ensure optimal functionality.
- PRECISION ENGINEERING - Achieve flawless prints with a minuscule 0.005mm accuracy.
- UNIVERSAL COMPATIBILITY - Seamlessly integrates with a variety of 3D printers, including Ender series and more.
The BIGTREETECHBL Touch V3.1 Auto Bed Leveling Sensor Kit is designed for precision and compatibility, offering a remarkable 0.005mm accuracy and a 1.6mm extended stroke. This sensor is compatible with a wide range of 3D printers, including various Ender models and advanced motherboards, ensuring a seamless printing experience. With smart self-testing capabilities and dedicated after-sales support, this kit is a must-have for any serious 3D printing enthusiast.


评论
F**D
Running on SV07+
Works great, way more accurate and consistent than my inductive probe with the bed heater on. Printed a bracket out of ABS to mount it to the toolhead.
B**N
Reliable and easy to install
Works great! Super easy to configure and calibrate
Z**N
great product, instructions for 32 bit (silent board) are inacurate!
BLtouch is a great product but instructions for 32 bit board need to be updated. I emailed the seller my discoveries who in turn will notify the ANTCSLABS.I have spend many hours trying to figure out this setup, I ended up figuring out that instructions are quite misleading and they would drive you off the wall.first of all, Creality BLtouch kit works fine, as far as hardware installation, but configuration of BLtouch on 4.2.7 motherboard is grossly inaccurate.Here is what I discovered by trial and error and watching bunch of youtube videos, many of them did not quite cover the topic correctly.First of all, you will need an micro SD card to save the settings on 4.2.7 motherboard, there is not much room left on EEPROM once all of the features are enabled and you will need to save them to micro SD card or when you power off your printer all will be lost. You will need to re-calibrate the Z settings again. If you forget to punch in Z offsets if the printer was powered off you will be printing a few millimeters up in air. Don't ask me how I know./// How to configure BLtouch after the device is physically installed and wired up///==================================================================Unplug the USB cable if connected to the computer, this prevents the 3D printers receiving the power to its motherboard.Verify BLTOUCH operation and correct installation==================================================================Verify that BLtouch is working correctly by moving the nozzle assembly at least 150 mm above the bed. We will issue auto home command and we need some vertical space so that can turn off the printer power if BLtouch is not stopping downward movement when its probe is touched.Via the printer menu select Prepare -> auto home – printer will start the auto home process and the nozzle will start moving down and BLtouch will extend (lower) its probe.As the nozzle assembly is moving down gently touch the BLtouch probe, the nozzle should stop, then resume downward movement. Touch the probe again for the second time and the nozzle will stop moving permanently. That means that BLtouch is wired correctly and it will stop when the probe touches the bed.Please note: Be ready to turn off the printer power if when touching the BLtouch probe the nozzle is still moving down! In that case you need to check the Bltouch for correct wiring to the motherboard.How to calibrate the Z offset==================================================================Via the printer control knob do the following steps:Select ControlThen restore failsafeAnd store settings.This erases any settings that were previously configured so we start with a blank slate. This is a very important step! If some old Z offsets are still in EEPROM and you start to configure printer you could potentially have the nozzle hit the bed because of old Z offsets were not erased. So, restore the settings to failsafe!note: make sure you have the micro SD card inserted.Auto home the printer==================================================================select prepareSelect Auto home and wait for process to completePrinter will auto home where it thinks the Z axis is. Please note; now there is a few millimeters difference because BLtouch is a few millimeters above the nozzle. This is by design to prevent BLtouch needle to hit the printed object.That is why we have to measure that difference and write it down to be used later.To determine Z offset==================================================================select Prepare,Then move axisThen move ZSelect 1mm and start moving the nozzle down towards the bedWhen you get close to the bed change to 0.1 mm incrementsInset a sheet of A4 paper on print bed (paper is 0.2 mm thick)keep lowering the nozzle via “move Z” slowly with one hand and keep moving the sheet of paper back and forth until there is slight resistance with other hand.You should be able to move the paper back and forth but with slight resistance.Now, stop and write down the value. The value in this image is my value, your value will be different!This will be a negative value somewhere between 2.5 and 4 mm as BLtouch probe is typically that much higher in relationship to the nozzle, and this value varies from one printer to another.This is the value that we will need to input into Z offset in later steps.To prevent accidentally scratching of the bed with the nozzle select prepareThen auto homeConfigure probe Z offset==================================================================select controlThen bed levelingThen probe Z offsetAnd put the value that you have written down for Z offset that you measured in previous steps.The value will be in negative (minus) so for example, -003.2 mm)The value should be typically between 2.5 and 4 mm with original creality Bltouch bracket.Finally, select store settings to save your Z offset!Exit the menu to the top and then verify that settings are correct for Z offset!Your value should be there!Bed leveling==================================================================Select controlThen Bed levelingThen select level bed The process will probe 9 pointsOnce that is done auto leveling is completed.Modify Cura settings for BLtouchIn Cura –select settings -> printer -> manage printersClick on machine settingsAnd add under Start G code:G29 ; (Auto Level / BLtouch mesh)M500 ; save the mesh EEPROMClick close and close again.Do a test print from cura!adjust the Z offset if neededgood luck!
B**I
Works as good as original
Installed on my E5 Plus. Now it can level the bed
C**.
Hopefully you have a few days to dedicate to figuring this thing out
I purchased this specifically for my Creality Ender 3 V2 Pro 3D printer. Being a budget entry level printer, it didn't have any auto-level sensor belt-in. I never would have thought auto-leveling was a big deal but after using friends' higher-end 3D printers, I felt it was well worth the $30-40 to get a sensor installed. Needless to say, I was very excited to get this installed and going.The package arrived in a tiny box, which was expected. Opening the box, I realized the instructions were very basic. The whole manual simply refers to "it installs just like a BL Touch". OK ... so I did a quick google search and confirmed the wiring for the BL Touch and this MicroProbe was identical. It's always good to verify, so I don't blow my mainboard out.Opening up my Ender and checking the wiring connectors, I realized this sensor has different connector plugs. While the Creality mainboard uses a JST-HX 5-pin connector, this MicroProbe used dupont connectors. Not a HUGE deal as you can simply plug in the dupont connectors. However since there's no clip, the wires may wiggle out over time. I should've known at this point, this MicroProbe was not meant for the Ender mainboard. After I installed it, I realized the wiring that was included was short by 4-5 inches. I had to re-route the wiring off to the side, instead of following the main wiring for the extruder. Again, not a huge deal but annoying nonetheless.After everything was wired up, I loaded up the latest firmware for Ender 3 with the 4.2.2 mainboard and CRTouch/BL-touch support. I turned on the unit and the MicroProbe went through it's startup procedure. The probe deployed and retracted a few times as it should. I went to the firmware and tried to auto-level but the microprobe never deployed. I tried multiple times and went through the menu and tried to manually deploy the probe but nothing happened. After messing around with four different firmware binaries, re-doing the wiring, trying with and without the Z-stop... I finally gave up.This thing looks awesome IF IT WOULD ONLY WORK! If spent nearly a whole day messing with it. Although I can probably dig deeper and go through the firmware to get it to work, I really don't think it's worth my time. At the end of the whole ordeal, I feel like BIQU released an untested product and left it for end-users to figure out. If you have the time and energy to do the R&D for BIQU for free, go ahead and order this.BIQU, here's how you can fix this product:1. provide the appropriate cable with matching JST HX connnector2. provide a cable that's long enough3. provide a compatible firmware for the Ender series and stock mainboards4. write a better manual. "it installs just like a BL touch" is not enough
D**E
Very technical setup
You have to know what you're doing or else you'll end up in my boat with a brick until solved. But that's on me, I take full responsibility. Now that I have it up and working properly, the mesh it's building is super accurate!
P**L
Would not work on my ender 5
Tech support took very long and getting back to me and they never solved my problem they only had short few sentence answers I heard that big tree had great tech support but definitely not my experience even though it could be a configuration problem I have they made no attempt to help me with it I sent them copies of printouts and just very lame I would say. And additionally it was their board and their unit.
R**L
Perfect
I have used this and the 3d touch. Both get the job done. This one feels of higher quality though, and the probe snaps back satisfyingly, plugs securely, love it.
常见问题
TrustPilot
2 周前
5天前
