🔥 Elevate Your Cooling Game!
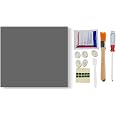
The PTM7950 Thermal Pad is a high-performance phase change material designed for optimal thermal management in devices like CPUs, GPUs, and SSDs. Measuring 80x80x0.25mm, it boasts an impressive thermal conductivity of 8.5W/mK and is engineered for durability, passing extensive reliability tests. The package includes essential tools for easy application, making it a must-have for tech enthusiasts.


R**N
Apply it right, burn it in.
I have been using ptm7950 for a long time now and there's a few things that you need to know. First off, this material is best used on a bare die head. It's really not for anything that's uses an IHS. It's best used for direct contact. It's best used for laptops, consoles, GPUs, and delided CPUs. The process is simple. Measure the die that it's going on. Make it a little bit bigger than what you measured. Cut it. Use tweezers to peel the back wrap off. Gently apply it to the die head. Use the included spatula to smoothen it out. Let it sit for a minute to start binding. From there, grab some tweezers and peel the top wrap off then take a knife or tool and trim the sides. Remove the excess. From there apply your cooler as per usual. When you boot you are going to have pretty rough temps. You are going to look at it and think it sucks. This is NORMAL. You need to remember that this starts off as a .25 mm pad. Typical paste flattens out to the thickness of a sheet of paper rather quickly. As TPM heats up it becomes liquid a little and as it does that there's less resistance between the die head and the cooler. As you heat ptm and cool it down the material starts to squeeze down under the pressure of the cooling assembly. For example. When applying it to my Dell G15 running a 3050ti laptop GPU it started off at 96 under max load. I ran marvel rivals for 3 hours then let it cool. The following day I came back, ran marvel rivals again for 3 hours and the max temp dropped to 83. I let it cool and the following day I came back again and ran another 3 hours and I received the results of 76 under 94 percent load. As you run it through its paces it will become more and more thin and it will perform better and better. This material is not for casual computing. The harder you work the machine the more it will become a liquid and the thinner it will become. It starts liquidating at around 56C. This material works as hard as your machine does. It's built to be ran through its paces. Take your time, apply it right, and burn it in. Let it do it's job. Not a businessman, gamer, graphic designer, or a video producer? Then this is most likely not for you. It's a very durable material that's built to go the distance. It can and WILL outlive the machine you are using it on and it does get better with time. If you want to speed up the process just apply it, run a few hours of stress testing, give it 2 hours to cool and let the cooler squeeze it down. Stress test it again. Rinse, dry, and repeat for a day or 2. When I started off my temps were 96 under load. After I finished it was sitting at 71 with the GPU maxed out.
W**F
Easy to install, easier to maintain. Great temps.
Great quality PTM. Replaced the hybrid compound from the omen 16 Max. It theory, it was smart, in reality, it got hot pretty quick. The reason... Pump out. This stuff, I've read on it quite a bit. Didn't know what I was getting myself into,but it went on smoothly. The film came off easily and effortlessly, and within 30 minutes, I had it reassembled and ready to break in. Results were immediately noticeable since the prior paste had pumped out, leaving hot spots. I ran quite a few benchmarks and was getting temps around 8-15 degrees lower than the stock paste. I used it to do the CPU and GPU and after 2 weeks, it has remained cool and stable.
R**T
Dropped my gpu temps 15 degrees
I used this on a 5800x3D and a 7900xtx. The cpu does idle at a lower temp but that's about the most I benefited from it, those 1st Gen x3D chips run hot though so it was to be expected.The 7900xtx though, wow, I had a 15 degree drop in hotspot temps. That is the main reason I was repasting my system, even with a custom loop the GPU hotspot would touch 100c often and I didn't like that.Application wasn't hard but it wasn't easy either. Once you remove the protective coating and are trying to peel the second layer while it's on the HS or Die it lifts easily and WILL tear if you are not careful.This stuff is legit good!
S**I
Good
As I write this review, my pc's CPU temps hover at 29- 32 degrees. Very good product. I came across it watching 'the greatest technician that's ever lived.' Funny guy.I bought this because i wanted the thermal past on my cpu to last as long as possible and this stuff works and actually improves overtime.Applying this to your cpu you must have patience. It's like removing a clear layer of a sticker. Take your time and you will get it on the cpu just fine. Press the corner of the ptm 7950 sheet on your cpu die to make an outline and cut it to size on a cardboard box. Then with the aid of a razor blade peel and lift up the corners of the clear plastic. try from different corners if one side is giving you trouble.Very good.
A**H
Works Fine, Applying it is a Tedious Mess
I bought this because I have heard about its longevity and wanted to replace my old, drying thermal paste on my CPU. I heard people say to leave it in a fridge for a few hours (3-5 hours), to help stiffen the pad for when application came around.But even still, It came to room temperature after a few minutes, and would just become a frustrating tedious mess. There are plastic films on both sides of the pad you must remove, and if you aren't quick enough to remove them while they are still cold, it is not a fun experience.However, my temps have improved compared to my old paste, and I do not have to worry about second-guessing my thermal paste application.Overall, a fairly decent product as it keeps my temperatures in check, but if a quick application is what you need, you might want to look at something else.
K**A
While under r
Changed my life, seriously stop using thermal paste and use this especially on laptops. Temps are so low that it keeps changing profiles