We remain fully operational. Our teams are working around the clock to ensure your deliveries continue safely.

DOWNLOAD THE APP


Customer Services
Copyright © 2025 Desertcart Holdings Limited
DOWNLOAD THE APP

🎬 Elevate your home theater game with Silver Ticket’s sleek 120" cinematic canvas!
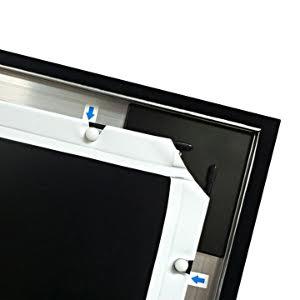
The Silver Ticket STR Series 120" diagonal fixed-frame projection screen features a 1.1 gain white surface optimized for native 16:9 projectors, delivering stunning HD to 8K visuals with a wide 160° viewing angle. Its heavy-duty 2 3/8" aluminum frame wrapped in black velvet absorbs light spill for enhanced contrast, while the wall-mounted design with adjustable brackets ensures a flush, professional installation. Quick assembly via a tension rod system makes it a top-tier upgrade for any home cinema setup.


| ASIN | B00CYLOTPK |
| Best Sellers Rank | #24 in Projection Screens |
| Customer Reviews | 4.8 4.8 out of 5 stars (5,000) |
| Date First Available | May 23, 2013 |
| Is Discontinued By Manufacturer | No |
| Item Weight | 33 pounds |
| Item model number | STR-169120 |
| Manufacturer | Silver Ticket Products |
| Product Dimensions | 109.25 x 1.25 x 63.63 inches |
K**.
Outstanding Quality and Value – Perfect 16:9 Upgrade
Excellent quality screen for the price. All materials feel solid and high-quality, from the frame to the screen material itself. Assembly was straightforward and took about an hour, even taking my time to do it right. This screen replaced my old legacy widescreen that wasn’t a true 16:9 format, and the upgrade is immediately noticeable. The image now fits perfectly, looks sharper, and really elevates the home theater experience. For the price point, it’s hard to beat the build quality and overall performance. Highly recommended.
P**T
Fantastic screen. Exceeded expectations.
I purchased the STR-169120 120" 16:9 white material screen. I reserve the 5-star review for the best of the best, but this purchase meets the criteria -- exactly as described, high quality product, straightforward setup, and good customer support. Before I even received the screen, the Silver Ticket reached out via email and linked the setup video. Even though it was an automated message, they made it clear that I had product support should I need it. Putting the thing together took a bit of time (>1 hour), but it was simple enough with the video instruction. Minimal tools required -- just a Phillips-head screwdriver. The physical instruction manual wasn't the best I've seen, but the video instruction goes step-by-step with great detail so I only glanced at the instruction manual briefly to confirm I had all the parts. All parts and hardware were clearly labeled and in good condition. Came with a few extra screws and plastic screen lugs, so that made me a bit nervous, but the setup was straightforward enough that I realized quickly that I wasn't missing any steps. My biggest concern was whether the screen frame would fit together perfectly enough to make sure everything remained in square and that the screen material would stay wrinkle-free and taut, but the attachment bracers pull the sides in nice and tight. I checked it with my framing square once I was done putting the frame together and it was pretty much perfect. The connections are tight enough where you can't even see the seams where the bars attach to one another. The tension rod system also allows you to stretch the screen over the frame really easily, and the end product was a nice uniform, wrinkle-free appearance. It sits against the wall more flush than my 65" LED TV and only sticks out maybe 3 inches. Looks fantastic and satisfies the perfectionist side of me. Mounting was really simple too. The 4 mounting brackets (2 top, 2 bottom) can be slid into desired position so you can effectively position the screen on the wall however you want without worrying about where your wall studs are. The only thing I would suggest here is sliding one mounting bracket in from each side (one from top left, one from top right, one from bottom left, one from bottom right) rather than sliding them in from the same side like they suggest in the setup video. The reason is because to slide one of the brackets to the opposite side, I had to remove the support bar, then it took some jiggering to get the piece to slide over the center joint. Minimal issue but worth noting. The quality of the picture at 120" far exceeds the picture when I was just projecting onto my white wall or the cheap white projector sheet that I purchased as a placeholder until I could get a real screen. The black frame actually absorbs light spill so even though there is a bit extra due to my angling of my projector and using keystone correction to fit the screen, you can't tell at all. Seriously looks like a professional quality movie screen. Overall, I'm beyond pleased with this purchase. Setup was simple and straightforward, it looks sleek and stylish, and it reflects a beautiful picture. Highly recommend if you are in the market for a fixed-position projector screen. 5/5 across the board.
J**S
A fixed screen is a MUST for a good indoor projector setup, and this one doesn't disappoint!
After researching a handful of brands I bought a 110" white (non acoustic) Silver Ticket screen on Amazon. I have it coupled with an Optoma HD143X ceiling mounted projector. This is the first time I've set up an indoor fixed screen and projector. I have an outdoor setup as well, which is my only frame of reference. Overall I'm very happy with the screen. It was fairly easy setup, step by step, and took about 2 hours to completely set up and mount to the wall. I worked somewhat methodically, and was able to do everything from start to finish by myself, including mounting it to the wall. That said, I'm pretty tall with a large arm span so this probably isn't feasible for most people. Some things to note: 1) I mounted my projector before even purchasing the screen to be able to figure out exact sizing. I had intended to go with the 120" screen, but after mounting and testing determined that 110" would be a better fit. 2) Once I had the frame complete, I turned on the projector and mounted the frame to the wall (NO screen attached yet). This allowed me to get exact placement more easily, and not run as much risk of damaging the screen while figuring this out. Once I had that figured out, I installed the mounting screws to the wall and took the screen down to do the final install of the screen. 3) Getting the screen back up for final install proved to be the most painful part. The mounting "sliders," once attached to the top two screws in the wall, did not want to slide horizontally. The weight of the screen and friction created made it quite difficult, so I detached one at a time and slid them into place then remounted, working back and forth, until it was right. I combined this with slight adjustments to the projector mount as well, though the sensitivity of those slight adjustments proved to be tedious as well. In any event, it was a bit of back and forth between the projector mount and the sliders for the screen, but it ultimately lined up perfectly. The screen looks fantastic and is perfectly tensioned (no wrinkles). The black edges absorb the bit of light from the projector, so the image runs top to bottom and left to right without any gap around the edge, ultimately looking perfect once everything was fine tuned. Additionally, the Optoma HD143X has a light band around the entire picture it puts out (something innate to the DLP chip they used which is not a flaw according to the company, but rather just how that chip is...I learned this after purchasing). The screen takes care of that issue so, while I can make out that light outside the screen edges, it's really hardly noticeable. Overall the most important part is these fixed screens (whether this one or another brand) are far cleaner looking than drop down screens (which I use in an office environment). If you're going to go to the trouble of setting up an indoor projector, the final setup is only as good as the weakest link. I'd definitely recommend a fixed screen HANDS DOWN if you care at all about final picture quality.
B**N
Good screen for great price
Since I upgraded to a 4k projector I’ve been wanting to change my HD screen but didn’t want to spend 1200-1400 on a SI. I saw the good reviews and write up in NYTimes for this screen and went for it. Huge improvement to my HD screen. I don’t really see how a more expensive one would be any better. Pretty easy set up.. watch the video instead of the written instructions. Glad I didn’t spend the extra grand for what I’m sure would have been a similar screen.
F**N
Customer Service was outstanding as they continued to track my product through to delivery. Packaging was solid, all parts were very secure and tightly packed. Assembling the 110” screen took approximately 45 min as I took my time to ensure measurements of the brackets were aligned. The instructions were extremely easy to understand and follow, don’t skip any steps that is the critical point! Quality of the screen was amazing relative to my previously owned 1080p, ever detail was so crisp. I highly recommend this screen if you are looking to upgrade or setting up your first one.
M**M
Excelente calidad de pantalla y de imagen, fácil armado e instalación aunque se necesita de ayuda para colgar, al menos en mi caso que es de 120 pulgadas y dificil de manipular para uno solo, la uso con un proyector Optoma modelo UHD35X 4k y de 3600 lúmenes instalado en el techo a una distancia de la pantalla de 4.5 metros con un sistema wifi denon 7.1 y set de bocinas atlantic technologies, reproductor Izzi 4k y un xiaomi mi box 4k, no puedo pedir más con estos equipos excepcionales y esta gran pantalla.
R**R
Excelente calidad y muy fácil de ensamblar, por el precio es sencillamente !
A**O
Increíblemente fácil de armar. Una persona puede armar la pantalla pero se requiere de dos para montarla en la pared. Mucho más fácil tensionar si se empieza por la esquinas. También es más fácil colocar la barra de soporte en su lugar y jalar con fuerza (el manual menciona que se ponga en diagonal y se use fuerza para colocarla en su lugar). Con un atornillador eléctrico se facilita todavía más el armado.
J**N
overall i am adding few pics and video for everyone to make there own decision but i am having a day n night difference for viewing experience , two years ago i bought a Xgimi UST projector my first , i had martin logan speakers from FRYS i bought them 16 years ago for a very good price, they all work amazingly still but i was missing a ALR screen because i thought white paint background would be enough but today its all changed now , asm took 2 hrs , its pretty straight forward , instructions kinda sucks though, Now putting it in the wall touching the ceiling was little hard but everything looks amazing please see it for yourself , black levels , colors & contrast with some light and with no light , OMG what a change going forward
Trustpilot
2 days ago
2 weeks ago