🎶 Revive Your Discs, Relive Your Memories!
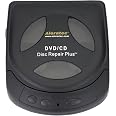
The Aleratec Motorized DVD CD Cleaner Disc Repair System is a portable and efficient solution for restoring scratched discs. With a motorized system and advanced scratch remover formula, it can restore up to 99% of scratches, ensuring smooth playback and prolonging the lifespan of your CDs and DVDs. Ideal for both home use and travel, this kit is perfect for preserving your cherished collections.
A**I
Really great cd buffer machine
Worked good on my cds and DVDs to buff them good quality product.Instructions were fairly easy would recommend reading the instructions for this particular machine.
T**G
a must have if you value your CDs
Easy to use and a no-brainer
J**T
NEEDS a modification to work well....
works well with simple modification.. the mechanics of the system work well but after several runs through the process my DVD 's were still freezing no matter how clean/shinny the system made them.. The problem seems to be that the buffer pads don't remove enough disc surface to get to the scratches.. I cut sticky-back 2000 grit sand paper and stuck it on the cleaning pads and that was too harsh and removed the data from disc...long-story-short, I switched to 10,000 grit sand paper and ran it FOR ONLY 5 SECONDS and the dvd played flawlessly no other actions needed.. if you cant find sticky back 10000 grit sandpaper find lesser grit sticky-back sand paper and elmer glue the 10,000 grit paper to the top of it..seems like a lot, but i'm restoring hard to find rare concert DVD's to playable condition, its worth the time and effort!
I**N
No replacement parts available, don't buy.
Don't buy. This product works well but there is no way to purchase replacement pads or fluids. The buff pads recommend replacement after 10 to 20 uses and the repair heads 20-25 uses. I was able to buff 20 CDs before I noticed they stopped working well. I was then able to buff 30 CDs doing each CD 2 cycles before the buffing became ineffective. If you could get replacement pads, this would be a major recommend, but without that it's just a waste of money unless all you want is something to clean CDs.EDIT: Don't buy even as a cleaner. Didn't even make 200 run cycles before the gears stripped and it stopped working.
A**R
Avoid using the red buff pads! Repair and Cleaning do OK but won't remove deep scratches
I've rewritten this review to reflect my latest experience. Just know up front that you may not be able to save your CD, but it's worth a try. As the Three Stooges once said when they were "doctors": "We kill or cure!" Same with this machine!First, about CDs, DVDs: The "playing" side is the thickest part of the CD, with clear polycarbonate meant to be scanned through to read the "pits and lands" at the data layer. The label side of the disc is the thinnest and closest to the data bits. If the label side is scratched, the disc is probably a goner because it's probably reached the data bits. If you hold a disc to the light and can see holes through it, you're probably out of luck unless they're very tiny holes your player can correct for. If the scratches are only on the playing (silvery) side, then you can probably fix it if you can polish or buff your way through the scratch (if it's not too deep).If you're looking for a simple, one step solution to all your unplayable optical media, this is NOT it! If you just want to keep it simple, try washing the disc in the sink, or buying another one. Or take your disc to some place that sells used CDs and see if they have a professional machine to take the scratches out. If you're patient and willing to work with a machine that's not perfect and work within its limitations, keep reading to see what I've discovered.There are much more expensive and bigger machines here that get the same complaints, so you might as well take your chance with this little thing and pay less for it if you're patient and willing to take a risk.First, this machine seems to do OK with very light scratches (the kind your player can probably read through) with the "repair" and "clean" pads (yellow and blue). Three very small drops of the repair "sauce", and one run makes it nice and shiny. As for the "clean" (blue) pads, they just use isopropyl alcohol to clean the surface of the disc. If you're only cleaning one disc, don't waste the solution by filling the reservoirs, just put a few drops on the small blue pads and go. If all you have is finger smudges on the disc, you can wash it in the sink with hand soap or dish soap, and you're good to go.What about deep scratches? For those, you'll want to pull out the red "buff" pads, and they will likely make your disc unreadable. So, if your disc plays but it's just ugly, don't use the red pads. Other reviews here say one pass with the red pads is OK, but my CD needed much more than that. Start looking for a new disc, and be prepared to give your disc up for dead before you pull out the red pads!I have two disks I've run through this machine. One was severely damaged with lots of tiny pits, and I had at first tried using sandpaper followed by Novus polish. (You can find this method on line: Start with 1000 grit wet sanding, and work your way up to 7000 grit, then polish to make it shiny again.) This manual method still did not take off enough polycarbonate to get all the damage, but did not introduce any new errors, at least. This was an audio CD, and the tracks that were good before I took the CD to hell and back were still good, and the ones that were bad before were still bad, though the disc was uglier after the process.So, I did several rounds with the red pads, and then took it through the yellow and blue, but I knew it was bad when I saw severe clouding in the inner (where the TOC and important data is) and outer edges of the data area. So, now the CD is completely unreadable. My advice: Never use the red pads unless you've already given the disc up for dead, because it'll take a miracle or a lot of manual intervention to bring it back. If one pass with the red pads doesn't fix it, be prepared to go the manual wet sand route.Anyway, the good news is, I had another CD with a deep scratch that I also wanted to fix. It was the worst kind of scratch: An arc right in the direction the disc spins, which affects too many bits for the reader to correct. I learned my lesson about the red pads, so I went with the manual sandpaper method above, which I had to do several times to get the scratch out. Finally I was done, but the disc was hazy after all that "torture", even though it now read the problem track. So, I ran it through this machine using only the yellow pads and washed the residue off under the sink. Now the disc looks almost new, and reads every track. (Your mileage may vary, of course!)Use this device with caution, and realize you may have to manually intervene to save discs with deep scratches. Also, if you're ripping or testing audio CDs, all that sanding and polishing may introduce other, hopefully correctable errors.For the most part, if you can avoid using this machine, do so. Try washing the disc under soap and water first. Most players can read through light scratches or correct minor errors, especially if they go from the inside out. If they follow the curve of the disk (like the pickup scratched it), you may be out of luck. Deep scratches may need the yellow "repair" pads and solution (sparingly, three tiny drops). You may need to be a skilled craftsperson with fine sandpaper to fix the really bad ones.If I do manage to save the ruined disc, it won't be thanks to this machine.The only reason to try to save a CD with this machine is to save another piece of polycarbonate from the landfill, and avoid having to buy another one if possible. Collectible and Out Of Print CDs will be worth less after taking them through this process, but if you succeed and make them playable again, that saves you from hunting for another one and paying through the nose for it, doesn't it?If you're handy with tools and like to invent hacks, I could see how this machine could be a platform for improvements, such as making it take fine sandpaper and polish pads.
S**S
This is the best 40 bucks I ever spent.
First off I see a lot of reviews with people having issues. I don't know if they are reading the instructions or not but you definitely have to read them. This thing fixed every single disc I have used it on which is pretty good because I didn't think it was going to work. I only used it on a couple of discs so I can't speak about the longevity. First thing you should do is get cotton pad with rubbing alcohol on it then wipe the disc with it. Use circular motions. Then use the included (or another one laying around) fine small microfiber cloth. Don't use the other microfiber with the bigger strands/bristles that's for applying or removing wax or cleaning windows. Make sure you wipe from the center out when using the fine microfiber. If that doesn't fix your disc and stop it from skipping then you should use this device. This thing isn't magic and it can't fix really bad discs. This thing does leave scratches on your disc so if that bothers you then shouldn't use this product. I have a large collection of all kinds of discs and this thing is a god send. I love this thing and it is very fun to use for some reason. I just hope that it lasts.
M**G
Instruction illustrations very small.
Works great.
Trustpilot
1 month ago
1 month ago