
DOWNLOAD THE APP


Customer Support

Desert Online General Trading LLC
Warehouse # 7, 4th Street, Umm Ramool, Dubai, 30183, Dubai
Desert Online General Trading LLC
Warehouse # 7, 4th Street, Umm Ramool, Dubai, 30183, Dubai
DOWNLOAD THE APP
Customer Support
Desert Online General Trading LLC
Warehouse # 7, 4th Street, Umm Ramool, Dubai, 30183, Dubai
Desert Online General Trading LLC
Warehouse # 7, 4th Street, Umm Ramool, Dubai, 30183, Dubai

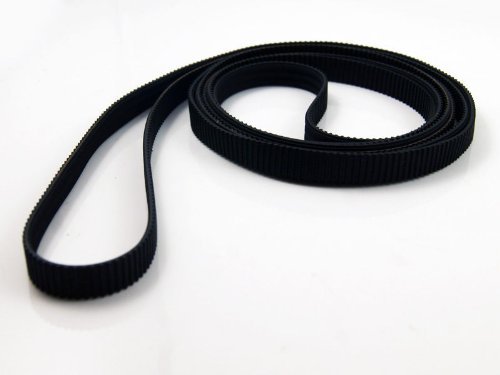
🔧 Toughness Meets Precision - Elevate Your Printing Game!
The HP Designjet 430, 450C Belt is a high-density polyurethane belt designed for 24" print width printers, reinforced with Vectran for exceptional durability. Manufactured in the USA in environmentally friendly ISO 9001 & 14000 certified facilities, this belt is guaranteed for 5 years or 6,000,000 cycles and features hermetic sealing to prevent oxidation and deterioration.
K**R
Five Stars
Replaced fairly easily after reading instructions online (copied below). Fits well and the printer works fine after. Happy camper.Instructions:The belt is not that hard to replace. You have to remove the center cover first. Using a flat blade screwdriver pry the right most clip away from the top and slide the cover to the left and it will come off. If you have a roll feed attached you will have to remove the 2 torx 20 screws one on each side and slide the roll feed about 1 inch away in front. Next remove the blue power button on the right side. It just pulls out. Now for the right cover you just pry the bottom away on the three sides and at the same time lift in an upward motion. If you cannot pry it away use the flat tip screwdriver to pry the little clips away in the center on each side. Carefully lift the cover up and look inside and you will see two latches which hold the control panel in place. Squeeze the latches towards each other and the control panel will separate from the case. Let the control panel hang down by the ribbon cable. Next remove the left cover doing the same as with the right and it will lift straight up. Once you have removed the covers you will have to remove the spittoon on the right side. It is held by one screw (torx 15) towards the front. Just watch as you remove it to see how to put it back. Just be careful of the wire that is usually looped thru it on the left. Next you have to move the trailing cable out of the way from the holding clips by the motor and on top and push towards the rear of the printer. Next you will have to remove the encoder strip. It is held in place by two nuts on the right side. Remove the nuts and push the metal bracket towards the other side of the printer and you should be able to release the cable. Next remove the bracket on the left side that holds the encoder strip. When you remove the bracket, slide the encoder strip away from the carriage assembly and put it someplace safe. It can be easily damaged or bent. Next you have to remove the bracket that held the encoder strip-fastening bracket on the right side. Again it is held by one screw (torx 15). Now you can remove the cutter to the right and off the frame. Make sure the carriage assembly is all the way to the left and remove the ink cartridge(s) from the carriage and flip up the top bracket from both sides that covers the trailing cable. Just look at it and you will see how releasing the ends outward with release it. Just remove the trailing cable connector from the carriage. Next put your hand around the motor on the right and push gently in and to the left to release tension on the belt and remove from the motor shaft. Remove the belt from the left side pulley and slide the carriage off the frame on the right side. Turn the carriage over and you will see how the old belt was held and just remove the old and put on the new. You will want to remove any crud that has accumulated on the pulley and motor shaft. This is very important, as not doing so will result bumping action. I would also put a light coat of oil (Tri-flow or similar) on the rail that the carriage moves. Reassemble in reverse. You will have to attach the belt to the pulley side first and then pull to the motor and slide the other end onto the shaft. The encoder strip will be a little tricky. You will have to flatten the end where the nuts were and slide the strip thru the back of the carriage and out the other side. You will know you have it right if the carriage moves freely. If the carriage does not move freely the encoder strip is in wrong and just try again. It is a lot easier then it looks. You can test your installation before putting on the covers by using the blue power button sliding it on the side of the control panel to defeat the open cover switch. Press the power switch in with a screwdriver and test. You will also want to use plain water on a lint free cloth and clean the encoder strip. You also may want to use the same to clean the bottom of the carriage assembly by the sensor and the contacts of the print cartridges. Also look at the condition of the spittoon on the right. Black ink builds up and if it is very high, get yourself some rubber gloves, disassemble and clean most of the ink out of it. You can also use a cloth dampened in water to clean the service station on the left side. Good Luck.
J**Z
This replacement fit perfectly
Had this printer in a store room for a few years and the belt simply dry rotted into string & crumbs. This replacement fit perfectly. Downloaded the service manual and read through it before attempting installation. Knowing what to do and in what order, the installation took about 45 minutes. Include the 30 minutes studying before hand if you like, but I thought it was pretty easy. Was not able to print immediately however because the inkjet cartridges had also dried up and had to wait on them. Seems the color cartridges for this model are in short supply but black is readily available. Great to have a large format printer again.
K**R
Small expense to my plotter going another decade
I was delighted to be able to repair my plotter with this new belt. A Little challenging to understand exactly the replacement procedure from the parts drawings online but once done the plotter works like new. I took about 2 hours to complete the process including some backtracking. It is probably a 20 minute to 1/2 hour job with experience.There are no technicians in my area so I was looking at hours of driving and several multiples of the cost of the belt. For anyone inexperienced an online search for good instructions is essential. One individual posted very good instructions with diagrams. Others, while well intentioned, posted such obvious sets of instruction I had to wonder about their intelligence. (Open the top cover, disassemble the plotter, replace the belt & re-assemble.) So keep searching for the help you will need if you aren't familiar with the plotter's mechanics.
R**D
Achilles Heel of HP Designjet 430
If replacing this belt for the first time, you will have a learning experience. Allow the better part of the day and be very careful to not break any of the plastic stuff that has to be flexed for removal. The HP belt is trashy; I just completed my second replacement (3rd belt). HP should be ashamed of making such a poor quality belt, especially when the rest of the machine seems to be quite durable.
M**F
HP Designjet Belt
Fit and functions fine, takes a few minutes to install. Only trouble I had was inadvertently disconnecting the control panel. Installation instructions are online from HP. We will see if it lasts longer than the last one.
T**.
Exact replacement.
Good quality belt for older plotter. Exact size and function. Works on HP 430, 450 plotters interchangeably.
G**E
Installation of belt for HP DesignJet 430 printer
The packaging was well protected and was in excellent condition .I would have benefited if installation instructions were included.The installation of the belt has been completed.I have not been successful in operating the printer.
D**N
belt
Fast service. Let's see, I need sixteen more words for this to be accepted. It's a rubber belt. the last one lasted 5 years before it broke. I'll get back to you in 5 years to let you know the quality.
P**I
Five Stars
Works just fine. More importantly it fits.
Trustpilot
1 week ago
1 month ago