
Desert Online General Trading LLC
Dubai, United Arab Emirates
Desert Online General Trading LLC
Dubai, United Arab Emirates
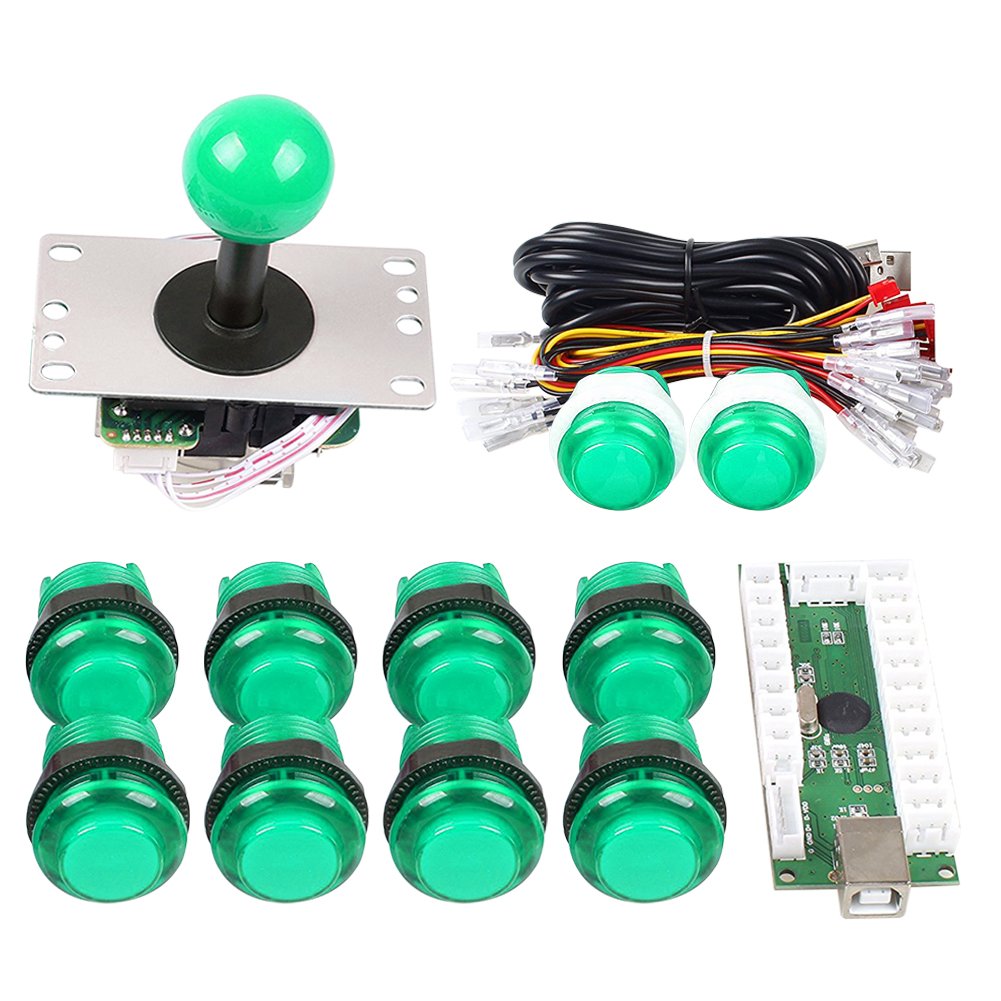


Gamelec Arcade Buttons and Joystick Kits for PC/RPi USB Controller DIY Projects. Features 1.Perfect for all the Windows System & Raspberry Pi with RetroPie System. 2.The Joystick is a 4/8 way professional joystick! 3.The buttons are 5V LED Illuminated push buttons with build-in Microswitches inside. 5.Please plug both USB Cables to the Device before you configure the control. Package Content 1x Zero Delay LED USB Encoder 1x 5 Pin 4/8 way joystick 1x USB Cable 1x 5 Pin wires for Joystick 10x LED illuminate buttons 10x 3 Pin wires for LED Push Buttons Note: The joystick is 8 way in default, if you want to change it to 4 way, please download the instructions refer to the instructions card or contact the seller for instructions. Free to contact us if any questions.
B**N
Good cost effective LED set.
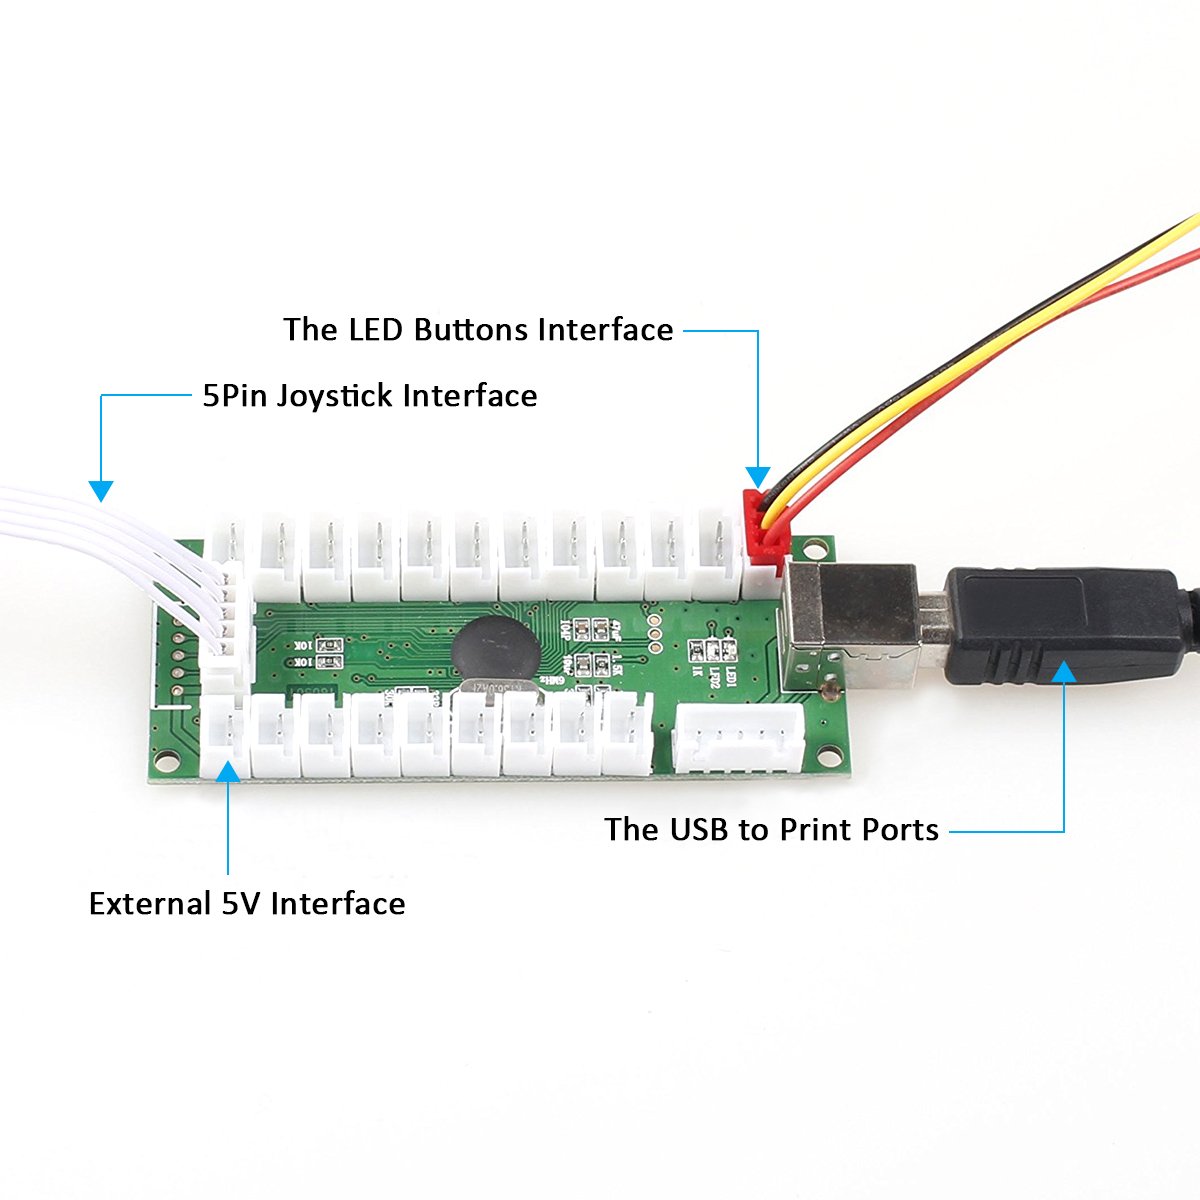
This is a good product for its price range and I would like to balance one of the other reviews with some information. There are higher quality components out there but they will cost more. A higher quality joystick (no wires encoder board or buttons) will cost as much as this whole set.Why not 5 stars? Well although I defend the lack of instructions below, if they went the extra step to include instructions for the first time builder it would be top notch and get that extra star from me.First the product;LEDs on the buttons are bright. They light up the button and the rim. If you don’t want that. Look for buttons with chrome or solid rims. The button its self feels like the diameter is a touch smaller than another brand I have, but they are a nice size. Joystick action feels good and I have not noticed much throw back (pushing right and letting go and your player suddenly moves left).The buttons and joystick do not come with wiring instructions but, there is a picture in the product description for the LED button and the USB encoder, and if you are building an arcade or controller there are tons of help videos and such to help you along. The arcade hobby community is very large.To add perspective to a somewhat negative review from someone else;The joy stick has what is called a restrictor plate on the bottom that you set to either 4 way or 8 way orientation. It takes strong fingers or pliers to pull the plate up and rotate it to the other position as it is. I modified mine to allow me to easily switch between the two orientations. I mention this because if you play a 4 way game like Pacman in the 8 way set up the game will ignore diagonal input and pacman will not respond if you accidently push down and left when you meant just left and this will appear as lag. You need to set the restrictor to 4 way for better Pacman and the like play.Flip the joystick upside down and look at the bottom of the joystick so the “up” direction is up or forward or pushing away from you. If the plate opening is a square you are in 8 way. If it is a diamond you are in 4 way.The wires are a thin gauge and thus delicate. They could have used thicker gauge but this gauge is normal. Electrical wiring is not about using “strength” it is about pushing in the right direction only. If you push down and sideways trying to get the clip on the pin will bend. I have big hands and so I use needle nose pliers to help slide the clips on and I try to remain aware to push straight down when sliding them on and they slid on well and clip into place so they do not fall off easily. Removing a wire is the same in reverse. Pull straight off (I will admit that a little side to side wiggle does sometimes help get clips off)True the buttons do not come with instructions but there are pictures on the product listing and if you are building your self an arcade or controller this is something you should be learning anyway.So, if it helps; In On the button there is a plastic box. That is the switch and the pins connected to are what let the button operate. I have copied the image from the description to help. This would be the yellow wire and the black on next to it. The black wire is ground. The bottom two pins (not connected to the grey box) are the LED. The red is power and the black ground. Notice how the black wire goes from the button to the led and then away. This is a shared ground. This also means the LED is always “on”.I wired my own ground chain for the LED ground pin and connected it to a switch so I can turn the leds off if I want.
S**.
Retro Arcade!
I purchased this arcade button and joystick kit to set up a retro gaming arcade system using the popular Lakka open source retro gaming software (similar to RetroPie). The full arcade cabinet is still a work in progress, but these buttons were very easy to install. I like that these have a screw on base instead of snap in, which makes them much easier to work with. They are lighted as well, which really enhances the overall look of the arcade. There are two smaller buttons and 10 that are a bit larger. This did not come with any instructions so wiring was a little bit of trial and error.
T**S
Great Replacement Buttons
A lot of items for the price and the buttons works great with my Arcade1Up cabinet. The only drawback was that the LEDs on two of the buttons did not work.
Trustpilot
3 weeks ago
2 days ago