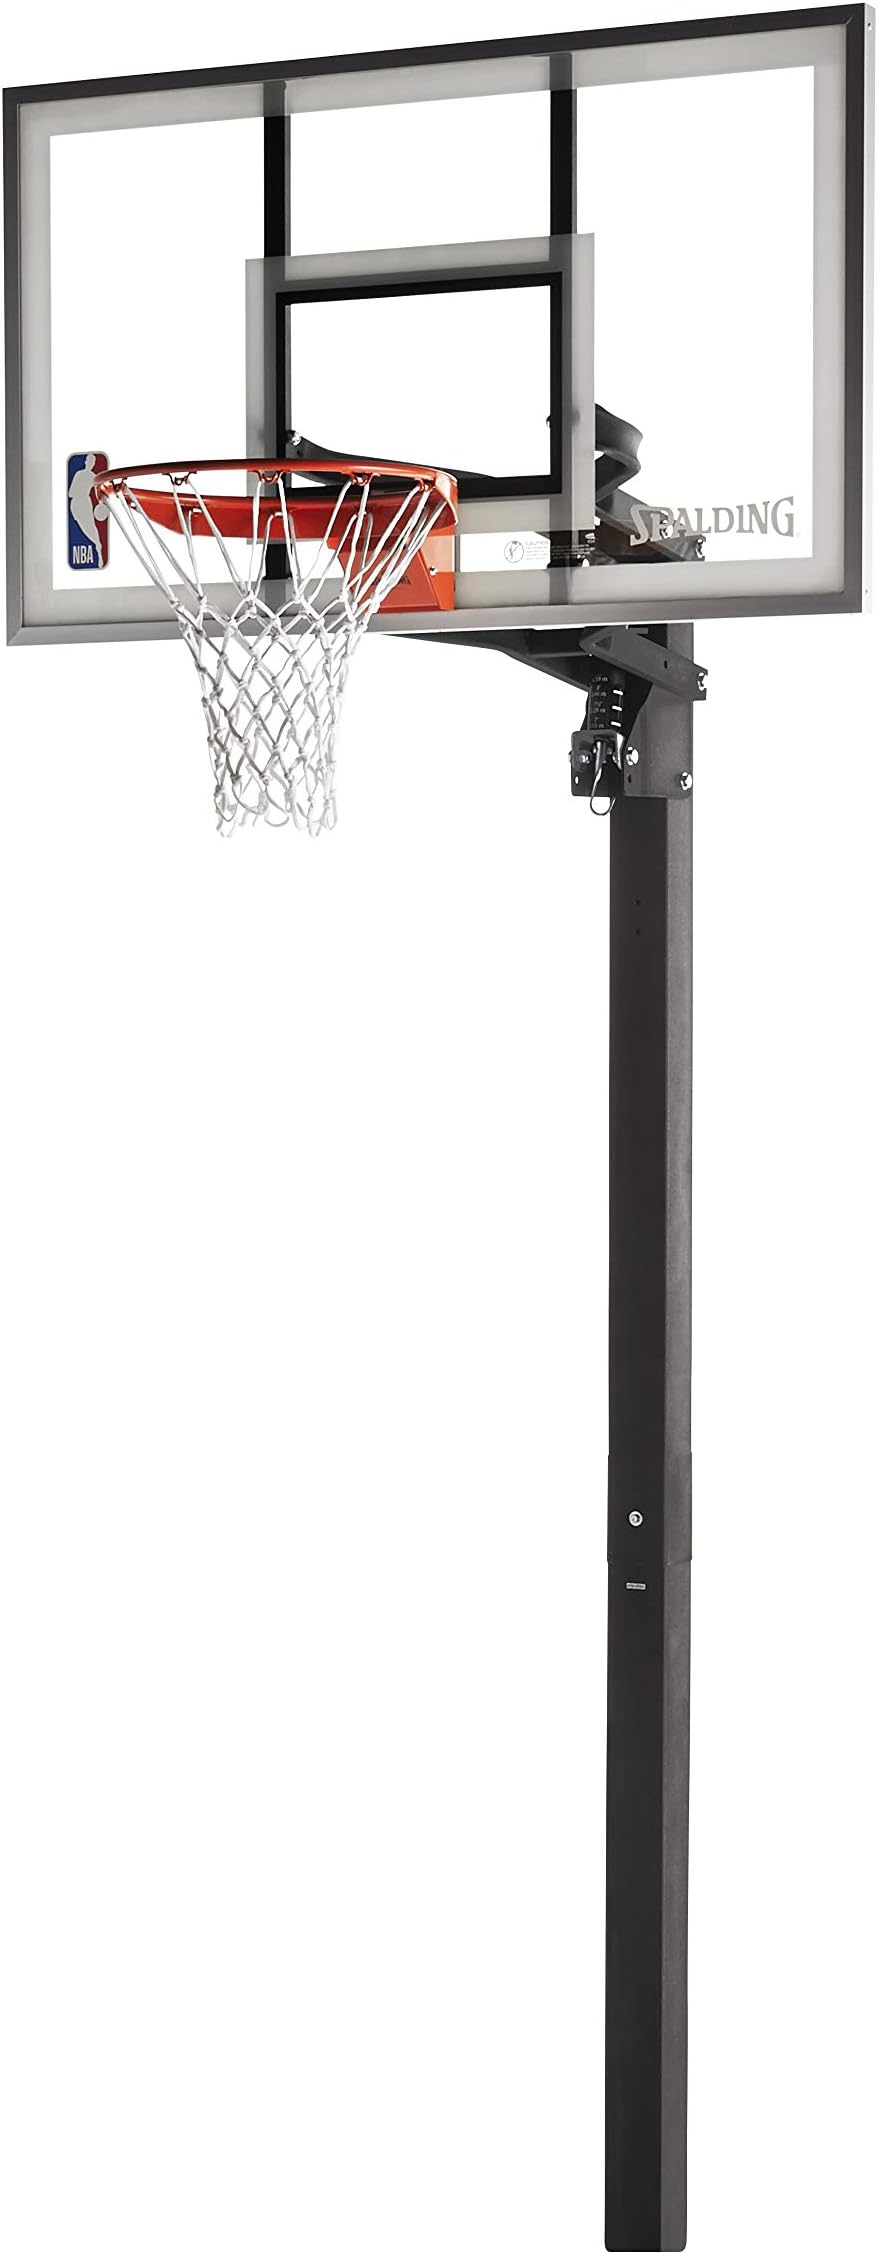


Spalding NBA Aluminum Trim Glass Backboard In-Ground Basketball System
Product ID: 89993251
Buy anything from 5,000+ international stores. One checkout price. No surprise fees. Join 2M+ shoppers on Desertcart.
Desertcart purchases this item on your behalf and handles shipping, customs, and support to Hong Kong.
Basketball thrives wherever there's a hoop and a dream. This in-ground hoop system sets the stage for your dunk contests and driveway battles. The tempered glass board has the truest rebound out of any backboard material, and it comes with a steel breakaway rim. The 2-foot offset gives you plenty of room underneath the basket, and the lift system provides quick height adjustment with the turn of a handle.
M**W
Adventure Installing, but Great Quality Product!
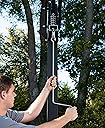
Well, I researched a lot before purchasing this hoop system. I wanted mid-range on price (under $400) but with sturdier, square tube pole and glass backboard. I have room and no need to relocate, so in-ground was ok with me. Took my time on the installation and spread it over 4 days (maybe 7-8 hrs in total). 3 hrs digging hole and prepping hole with rebar and forms on day 1. 1 hr assembling the pole on day 2. 3 hrs Pouring concrete and installing pole on day 3. And, 1 hr assembling rim and hanging backboard on day 4. Here are a few lessons learned along the way:Hole -- 2 foot deep X 2 ft diameter hole doesn't sound like much, but in dense, gooey SE Texas clay, it was not so easy. Switched back and forth between post hole digger and using shovel to scrape clay off of the digger. At the end, I used the shovel to bell the bottom sides of the hole for more stability. Used wire mesh tied with zip ties into a cylinder as reinforcement. Added two pieces of 3 ft long rebar in center of hole protruding vertical to slide pole onto later to increase sturdiness. Squared off the top of my hole to fit a 2 ft square 2x4 form. Onto the form, I built a support for the pole to clamp on during concrete pour and curing.Pole -- The 4 inch tubular square pole comes in two heavy sections. Believe the hype. These two pieces may belong together, but they don't wanna be together. It took about an hour to get the pieces started into each other about a half inch while balancing horizontal on saw horses, then dropping them (cement end down) onto a concrete block from a 3 ft step ladder to get them in the required 4-5 inches overlap. Once you get started and a rhythm, they slide in nicely. Just took some experimenting to figure out how to make the connection. Once on, it will never come off. Very tight! I also drill two holes on the bottom end that will go into cement and added to radially protruding 1/2 inch X 4 inch long anchor bolts to increase the bond area when cementing into ground. Probably overkill, but methinks my hoop pole will stop a train.Pour -- Ok, key here is to have plenty of time (say 3 uninterrupted hours) as you want to fill the hole and about 3/4 of pole in one pour (even if it causes your daughter to be late to her soccer match -- doh!). Took me 12 X 80# bags of Quikcrete in total (hole + pole). Mixed in wheel barrel one bag at a time and poured directly. Slid pole onto my rebar pieces and into hole (clamping onto the 2x4 supports fixed to my forms) about half way through the pour, leveled well and clamped. Tossed the plastic insert like others suggested for a more sturdy system. Plus, I cannot imagine ever moving this sucker once in the ground. Make sure you tape the seams and holes on the pole and keep pouring concrete to fill hole and about 3/4 of pole. You will leave top part of upper pole (about 2 feet) hollow so you can thread-they backboard supports later. Used a milk gallon jug (cut in half) as a scoop to add concrete to the pole from a ladder. Didn't follow the directions here, which have you fill the pole with concrete before installing. That woulda been way too heavy.Backboard -- Ok, this was actually easy(ier). Assembled just as instructions show and was able to hold the backboard up by myself while my 12 year old daughter threaded through the bolts. We ditched the nylon net and went with a metal net from Amazon ($3) cuz we love the sound it makes. :)All-in-all, we made it a family installation adventure and spread it out over a few days to keep it from getting tiresome. Think of it as a fun project, and not a quick job otherwise it could get frustrating. The end product is very stable and sturdy... Nice quality. Kiddos and I are out shooting hoops every day! Enjoy!
A**R
Following instructions exactly results in a wobbly pole
I don't review products too often on Amazon, but I have to say something regarding this goal.First of all, while I expected the installation to be a little difficult, I NEVER expected it to be as bad as it was. I've seen other systems installed and knew generally how it's supposed to be done, but this one seemed very different. The pole did NOT want to go together. I did exactly as the instructions mentioned by picking up the pole and banging it on some wood scraps. Took hours and many wood scraps banging the pole to get the holes to line up even with lubrication. And then, in one hit, the pole slid too far and the holes weren't lined up. Oh well, I just put the bolt through any way and figure 3/4" of an inch wasn't that big of a deal.Then came putting the pole into the plastic sleeve. Now, I read reviews about people that ditched the sleeve entirely, but I also read that Spalding will not warranty any product that doesn't follow the instructions exactly. Ok, fair enough. I'll do it the Spalding way. So after I filled the pole with concrete and let it cure, then I went to put it in the sleeve. Another gigantic pain even with lubrication. It finally went after about 45 minutes to an hour banging it in with wood scraps and a sledge hammer. It was a little wobbly, but I thought "the clamp should shore that up." Put the clamp on and to my surprise the pole wobbled in the hole. Mind you, I read reviews saying it would do this, but I thought I'd follow instructions as I was supposed to.So now, we have a pole in concrete that I'm not exactly confident with knowing that it moves. I don't think it's going to break or anything, but I definitely was expecting it to be secure and BARELY move. We'll see how long this lasts. I fully expect to be calling Spalding for support with a warranty claim.
M**R
Overall a good buy with some minor issues
For the money, it is a good purchase. Though I would wait until it is under $350 before buying. And remember you will also have the cost of concrete. Here are the pros and cons:PROS:1) I bought this in 2017. It appears they have addressed the tight fitting post issues, as they went together with 2 swift bounces on hard ground. I had purchased the same post about 8 years ago, and it was a nightmare. So, at least they are looking at the reviews.2) I cemented the post into the ground without using the tube. It went perfectly, as long as you remember to lower the pole around 13" beneath the level of your playing surface. The one I installed 8 years ago, I used the tube, and had no issues with wobbling. So, I think you are fine no matter which option you go with as long as you follow directions.3) The rim is good quality, and the cover for the break-away spring is steel, rather than the plastic they used to use. It looks very professional, though I wouldn't treat it like a high-school breakaway rim (no extreme dunking and hanging on the rim).4) Looks very nice when completed.CONS:1) The adjustment mechanism is pretty bad. Very hard to raise, and when lowering, it is not smooth but rather "shudders" all the way down. I tried loosening and tightening all the pivot fasteners with no improvement. If you have a second person available, have them take the weight off of the backboard with a 2x4 while you raise or lower the rim. MUCH easier, but certainly not very convenient.2) This is a picky "con", but be aware that when you fill the pole with concrete, some of the concrete/water will seep out of the square holes in the pole and also out of the seam where the 2 pole sections are joined. This stuff will harden and is a bear to remove from the pole. You have to use a scouring sponge (like the green and yellow one in your kitchen sink) and water to remove the streaks. Eventually, the stuff will mostly weather away, but looks pretty bad for awhile.3) Not necessarily a con, just part of assembling a large and heavy item, but putting up the backboard will absolutely require 2+ people. It is heavy. I held it in place while standing on a step-stool, while my wife stood on a ladder and assembled the nuts and bolts.
Trustpilot
2 weeks ago
1 month ago