Some deliveries may take a little longer than usual due to regional shipping conditions.

下载应用程序


💥 Light Up Your Life with Fancierstudio!
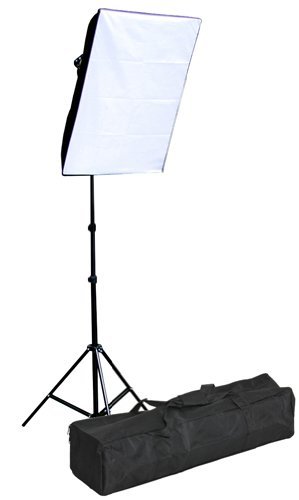
The Fancierstudio 1000 watt softbox lighting kit is designed for professional video and photography needs, featuring a robust 7ft light stand, five adjustable bulbs, and a portable carrying case, ensuring you have everything you need to create stunning visuals wherever you go.
B**D
Does a great job but a real pain to assemble.
First - yes I would buy it again. The price was right, it appears sturdy and well made - and using it today in my home studio for head shots it did a fantastic job - in short it did exactly what I wanted (and I will probably buy another).That being said, one needs the patience of Job to assemble the thing. Although the directions appear to be clear (at first glance) with photos and step by step guidance - they were of little use - and I had to figure it out oh my own. Here's how I did it - and once I figured out HOW to do it - it only took me 10 minutes to get the soft box together.1. After taking everything out of the boxes, lay the five holder light socket on a clear sturdy table and make sure all the light bulbs fit and work! (Don't want to go to the trouble of assembling the unit only to discover it doesn't). Mine worked beautifully.2. Set up the stand. Once you get the softbox built you'll need a place to put it. I had to dig out a piece of hard plastic that was "stuck" in the hole through which the tightening screw goes. Also, make sure you have the feet of the tripod spread out as far as they will go as this unit is top heavy.3. Now the hard part. (Really. If I was a nervous person or in a hurry I would have gone to bed for two days after throwing this out the window).a. Unplug the light socket from the cord.b. Set the socket on its bottom with the EMPTY sockets pointed up. (You risk breaking the bulbs doing this so do it with the sockets empty.d. Unfold the black cover and open up the velcro closures.e. Place the opening of the cover over and around the light socket. Do not close velcro flaps. Just let it lay there.f. On the edge of the light socket there are (6) holes the (4) rigid metal rods fit in. You want the holes at (clock face) 10, 2, 4 and 8 o'clock - just Ignore the other holes.g. The rigid rods have two silver ends. It is the end with a rim that you want to put in the holes. Reaching in through the center, insert one - make sure its pressed in securely (it doesn't snap in - it is kept in by tension).h. Lift up a corner of the cover (there are four) and insert the simple end of the rod into the little black pocket. IGNORE THE WHITE VELCRO piece I thought was meant to help keep rod secure. It is not for the rod and will not hold it. (The white velcro is for the inner diffuser piece should you decide to use it).i. Now work you way around and do the same with all four rods, inserting the fancy end into the hole and the plain end in to the black pocket.j. Once all the rods are situated, close up the velcro flaps around the base.k. Place the assembled unit onto the stand. (It can be placed either vertically or horizontally).l. Put in the light bulbs and (remember to plug in the socket you removed earlier.m. Attach the inner diffuser if desired.n.. Attach the outer diffuser.That's it. Hope this helps someone.
B**T
Great Value for money, if you can stand the assembly
I received this Fancierstudio 1000 watt softbox lighting kit softbox light kit video lighting kit with carrying case by Fancierstudio 9026S Single in a giant box, something that could probably fit a fold up table. Inside I found the actual packaging and inside that, the travel bag that is shown in the preview photos.The bag is of decent quality and I'm sure it would last many years of travel or storage and it is a nice addition to the kit.The actual assembly of the lightning kit was very very frustrating, but eventually worth it. I spent perhaps 25 minutes attempting to slowly put it together like the directions show. Which reminds me, the directions are useful, but don't show enough detail for them to give you a noticeable advantage if you received this product blindly. The main issue I had was keeping the soft box on the light socket head while hooking in the rods. It's a tight fit, but eventually it worked just fine.The quality of the product is quite good for the price considering all you get. The tripod is just enough to hold it. From the looks, it seems to be a normal tripod bolt head so you could place a small camera on the tripod, but the tripod is weak. I wouldn't put much on it besides the soft box. When the soft box is attached to the top it feels very secure and turns very smoothly. Be sure to extend the legs out as wide as possible or when you push on the switches it might tip over. Or just be sure to use two hands to hold the light and turn on the switches.I don't know how to gauge the brightness, so I can't tell you if it's really 1000Watts or some other value, but it is very bright and very soft. I have it placed above my computer monitor and a green screen behind me for desktop recording work. The light it does produce does feel rather cold, so if you are doing some recording work, either replace the rest of the lights in the room to match the color temperature or maybe replace the included bulbs with something warmer like 4000k.Overall, I am very satisfied since my install is mostly permanent, I don't plan on tearing it down and reassembling it any time soon so it fits my needs perfectly. I wish I bought two.
A**L
Needs a sturdier adjustable clamp holding the softbox. Keeps tipping down.
This is not bad... Gives you the light. Works OK.Pros:Price is good.Cons:Not easy to assemble the little wires supporting the softbox, but once it's done, it's OK as long as you don't have to fiddle with it.Worse thing-- the softbox/light unit is too heavy for the twist-tight adjustable clamp. The unit will just tip down until it rests on the tripod pole. I can tighten it and get it to stay when the light is facing up to the ceiling, but that's it. It will not stay in the position it's shown in the photos.
TrustPilot
1 个月前
4天前