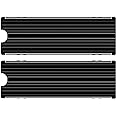
🔥 Keep Your SSD Cool and Collected!
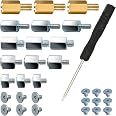
The M.2 Heatsink SSD Cooler is a high-performance cooling solution designed for M.2 2280 SSDs, featuring a double-sided aluminum alloy design that significantly reduces temperatures by 10°C to 30°C. It includes a nano thermal pad for excellent thermal conductivity and is compatible with various SSD brands, ensuring easy installation and a sleek look.
A**.
YES!!!
Clear instructions, good quality thermal pads and heatsink, lower my NVME's temps 10 Degrees Celsius (50 degrees Fahrenheit). Plus, it's a 2 heatsink combo for two NVMEs. 5/5
D**N
works well for better than stock heat dissipation
As stated, I used this to replace the stock motherboard M.2 "heatsink"(or more aptly big slab of metal). I have an odd use case comprising an ATX pc housed in a 4u server case, that I use as a media server. The stock M.2 heatsink is just a decorative big slab of tin that does a decent job of moving heat away from the nvme. Recently I doubled the number of HDDs in the case and this cause a knock on effect of raising the temps of everything in the case, including the M.2 nvme. The case still has ample airflow, it's just hotter than it was before, and i noticed the nvme was getting a little toasty for my comfort level. Before getting one of the cheap M.2 heatsinks with a built in cheap A.F. fan I figured i'd give this one a try. Behold it works! Installation was quick and easy, just pay attention to the pad placement per the instructions(or don't, it's probably fine either way), then reinstall the drive. I've noticed a 10C drop since adding the heatsink, over the stock mobo slab.Make sure you have space, and if you need the extra cooling this is a fairly good/cheap way to bring down your drive temps a few degrees. This definitely won't fit underneath a gpu of other pcie device, but if you M.2 is above the gpu slot/below the CPU, this is better than the stock mobo heatsink. That being said almost all of you won't need this.
E**N
SSD heatsinks for the economically frugal, but a good choice.
The two heatsinks are decently built. My two NVME SSDs went down about 2 to 3 degrees Celsius each at idle. Not a huge change, but they're definitely a bit cooler than before. My Intel SSD (PCIE Gen 3) was 31C but now at 28C. My Samsung 990 Pro (PCIE Gen 4) was 32C but now at 29C. These are idle figures.When I game at 99% GPU (280W+ on RTX 5070 Ti at 64C with fan at approx. 2700RPM), based on my current build, my Intel SSD goes up to 58C and my Samsung 990 Pro goes up to 47C. My internal case air temp is not exhausting air fast enough so my CPU & GPU heat up both of my SSDs. When I leave my side panel completely open, every temp drops about 3 to 5 degrees.The heatsinks look quite good inside the PC case. Blends in well with the motherboard without calling out any attention. There were some hairline scratches on the black paint, but you can't see them when installed inside the case. You only see them under a lamp.My second SSD is below the 5070 Ti graphics card on the MB. I was super concerned that this particular heatsink would not have enough clearance. Luck for me, the GPU case frame just barely touches the top of the heat sink. It's tight but completely clears it nonetheless.The thermal pads were pretty snug. I had no issues with the thicknesses. My SSDs were both single sided.I love the two extra screws. I used them both and replaced my existing screw-down screws. That was a nice touch to include two extra SSD screws in the package.
G**N
Excellent Kit
This kit was easy to use and works well on all of my M.2 ssd. Temps are lower and stable.
R**E
I was able to fit these in a 27" 2019 iMac's NVMe slot after a small modification
I wanted to replace the 500 GB NVMe that Apple had used in my 2019 27" iMacs with 2TB Gen4 cards, but was concerned that they might run too hot. Which means I needed to wrap the card with some sort of heat sink. I had read that you might, or you might not, be able to use this or that heatsink in this iMac due to the added height of the heatsink — it sits dangerously close to the back of the enclosure down there by the USB ports.I rolled the dice on these heatsinks because I felt they were the best bargain I could find. I used some 0.5mm high-conductivity heat pads between the SSD and the heatsink, top and bottom. (Remember: the thicker the pad, the lower its heat conductivity!) After sandwiching the SSD in the heatsink, I mounted the assembly in the slot on the PCB, and did a test fit of the logic board in the enclosure. But sure enough, one edge of the heatsink was contacting the back of the enclosure, preventing the logic board from seating correctly. Drats!I could see that the interference is just on one edge. The other 3 edges are clear by a lot. After removing the SSD/heatsink assembly, I took it to my bench-mounted belt sander and lightly sanded the edge that was causing the interference. Have a look at the pictures to see how much I had to sand away, and to what edge. Since the heatsink is made of soft aluminum, it did not take a lot of sanding to remove the offending edge. I sanded away material until I was near the sink's screw, and stopped there. After that, when I mounted the logic board in the enclosure, I could easily slide a piece of paper between the heatsink edge and the enclosure.Buttoned the iMac back together, and the card works beautifully. I'm not a gamer, so I doubt I'll ever heat this card up, but it's good to know that if I do anything that might get the CPU cooking, I'm ready for it.
TrustPilot
1 周前
1天前