We remain fully operational. Our teams are working around the clock to ensure your deliveries continue safely.

下载应用程序


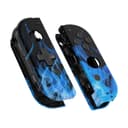


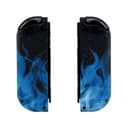
🔥 Upgrade your game, grip, and style — because ordinary just won’t do!
The eXtremeRate Blue Flame Soft Touch Joycon Housing is a premium replacement shell for Nintendo Switch and Switch OLED Joy-Cons, featuring an ergonomic D-pad for improved gameplay, a unique blue flame design with a soft-touch anti-slip finish, and a comprehensive DIY kit including buttons, screwdrivers, and spare screws. Ideal for gamers seeking a stylish, functional upgrade with moderate installation effort.


| ASIN | B07X1JB26J |
| Best Sellers Rank | #7,849 in Video Games ( See Top 100 in Video Games ) #140 in Nintendo Switch Faceplates, Protectors & Skins |
| Brand | eXtremeRate |
| Color | Blue Flame |
| Customer Reviews | 4.4 4.4 out of 5 stars (2,003) |
| Enclosure Material | Plastic Acrylonitrile Butadiene Styrene (ABS) |
| Finish | Soft Touch |
| Hardware Platform | Nintendo Switch |
| Item Dimensions W x H | 4.53"W x 1.97"H |
| Item Weight | 85 Grams |
| Manufacturer | Extremerate |
N**E
Best joycon shell replacement kit out there.
I've wanted to do a joycon shell replacement for a while, and since I needed to ooen up a pair to replace their thumb sticks anyway, I decided to give thus kit a try. The shell design is very nice, and the 'soft touch' finish makes it feels like a first party product. Most of the necessary tools are included, but you'll also want a small plastic pry tool and a good pair of thin nose tweezers. Extra springs and screws are included, which is great because the shoulder button springs get lost easily and the official joycon screws are pretty soft. The buttons come on a plastic sprue & will need to be clipped off and cleaned up with a small file or hobby knife. The actual shell replacement process is a bit finnicky, especially on the right joycon, and you have to be very careful not to damage the fragile ribbon cabled. Definitely only try this on a pair of joycons that you'd be willing to lose if it goes wrong. That said, after watching a few youtube demonstrations, I was able to successfully change out the shell without too much trouble. Everything works great (better than before, since I replaced the drifting thumbsticks), feels great, and looks amazing. One thing to note is that the D-pad is just a plus shaped piece of plastic layed over the normal internal parts of the left joycon's four directional buttons. It's very clicky, and it doesn't have the pivot point in the middle that real d-pads have to prevent you from pressing opposite directions at once. If you press the middle, or press anywhere with too much force, then it will read all four directions at once. It's still better than the normal directional buttons, but if you're just looking for a good d-pad for playing 2d games in handheld mode, then get the Hori left d-pad controller instead. It has a proper d-pad, and you don't have to risk breaking a joycon conttol to use it. But if you want a fancy set of full featured joycons that can't be bought in stores, and you're willing to put some work and a bit of risk into them, then this kit is great.
T**I
Good Quality
These controller shells looked great and felt great, no complaints and came with everything they needed.
J**E
High-Quality Joy-Con Shells with Great Design, But Challenging Installation for Beginners
I recently purchased these shells for my Joy-Cons and was impressed by their quality, appealing design, and reasonable price. The final result looks great, though the installation process was a bit tricky—this is more due to the complexity of working with small electronics rather than any flaw with the product itself. With prior experience disassembling devices like the Switch, Steam Deck, and laptops for repairs or upgrades, I found the process manageable but still challenging. The kit includes useful tools, such as extra screws, springs, and a screwdriver with both Phillips and Y-head bits, which were appreciated. However, I would have liked needle-nose tweezers to be included, as they made handling small components much easier (luckily, I had my own). The installation guide on their website was helpful, but it referenced a slightly different version of the kit, which added some unnecessary steps and caused minor confusion at first. That said, it’s still a good tutorial overall. I don't often write reviews, but this product deserves one. I highly recommend it and might even pick up another set for my second pair of Joy-Cons. That said, if you don’t have experience with electronics repair, this may not be the best project to start with.
D**W
Great look and feel, nice customized touch, recommend seeing a professional to instal
I love the way these look, and love the way they feel like official Nintendo Joy-Cons. They’re strong, beautifully done, and give the left controller a much needed d-pad. That said, these are not “easy to install”. I watched a few videos and decided that this is not at all what I want to try my hand at tinkering with. I took it to my local electronics repair store and they were happy to do it for me (and include a warranty should they fail). Overall, they make the joy-cons unique and fun. My friends with switches were thoroughly impressed with them! If you are a professional/talented DIYer, go for it! If you have access to a professional, go for it! If you have never done something like this before, go for it (at your own risk)!
E**C
Tricky, but not difficult, to install
These shells fit perfectly. Every tiny little notch from the original joy con shell is perfectly replicated, as well as all the buttons. I LOVE the looks of these and I also really love having a D Pad instead of 4 arrow buttons. It comes with replacement screws and springs, but I just reused the originals which fit perfectly. It also comes with replacements for every button, but the original buttons fit too. I opted to only replace the ABXY and SL/SR buttons with the included purple ones, but they include all of the buttons except for the rear latch release. The shoulder buttons they include are black, not purple. Installation took a combined two and a half hours for both; most of that time is plugging in the tiny ribbons and delicately pulling out components that are stuck on with tape. You WILL need tools for this; it will be very difficult to do with just the included screwdrivers. I purchased a joystick replacement kit which came with curved tweezers, a separating pick, and a plastic spudger. Replaced the joystick at the same time since the stock Nintendo ones tend to develop drift over time. Just don't yank on anything and you won't cause damage. Just be confident and mark the screws you remove well.
S**N
This was my first ever experience opening any electronics up, and basically even using a screwdriver aside from a few occasions. I have to say that this process is not nearly as difficult as many people have said. If you are careful, everything should go smoothly. Here are some tips that made it easy for me: 1. Use a better set of screwdrivers and get some tweezers 2. I found that these screws aren't too bad to work with but be careful not to strip them. I had worse look with the screws on my switch itself then in the joycons. Once you have the Nintendo ones out, switch them with the replacement screws. They strip less easily and are Philip's head. 3. Layout tape on a piece of paper in the shape of a joycon (small rectangle). I played out three of those, representing the outer, middle, and bottom layer of the joycon. Each screw I took out was placed on the tape, in the same position that they'd be placed on its respective layer. This helped keep all the screws organized, and made reassembly a breeze. 4. One of the difficult parts of this process is fiddling with the delicate ribbon cables. I simply didn't undo any of them, and I unscrewed everything. Once it was all unscrewed, I transferred over all the insides into the shell in one piece. You have to be a little careful moving it. It is also a little harder to work with since you have all the parts dangling around, but I preferred that then dealing with the cables. As for the product itself, it feels very high quality and nice to the touch. It's defintely on par with nintendo's quality. If i saw these at someone else's house, I would believe they were an official nintendo product.
J**P
Very impressed with the price, quality and instructions for updating my joycon skins. Process is a little fiddly because of tiny parts, so video demo was very helpful. Wood grain looks great with the Tears of the Kingdom OLED Switch. Will definitely look st updating my pro controller skin too.
M**Y
Eine super Alternative zu den Originalen Nintendo Joycons. Das Cover kreift sich gut und solide an. Nach meinem Empfinden besser als die Originalen. Auf den Originalen stehen hinten Warnhinweise drauf sowie Nintendo umd das EC Zeichen der EU. Auf den hier steht nichts, schön schlicht. Ich liebe das Gehäuse.
C**E
Contant de mon achat
F**Y
Alles zit er bij om de vervanging te doen. Kwaliteit van het materiaal is super, vervangen is vrij makkelijk. Als je niet eerder een joycon hebt opengehaald hebben ze op de website een complete set videos om je er doorheen te leiden.
TrustPilot
2 周前
2 周前