🐾 Where Ferrets Play and Owners Relax!
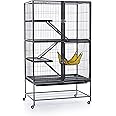
The Prevue Pet Products 485 Feisty Ferret Home is a spacious, eco-friendly metal cage designed for energetic ferrets. With four levels, two large escape-proof doors, and easy-rolling wheels, it offers both comfort and convenience. Measuring 31"L x 20"W x 54"H, this stylish home ensures your furry friend has a safe and entertaining environment.
Number of Levels | 4 |
Number of Doors | 2 |
Additional Features | Eco-Friendly |
Gap Size | 0.87 Inches |
Item Weight | 23.6 Pounds |
Item Dimensions L x W x H | 31"L x 20"W x 54"H |
Color | Black |
Material Type | Metal |
S**Y
> IN GENERAL AND AS A BIRD CAGE
GENERAL DESCRIPTION> The Prevue 485 is a well-designed, well-built general purpose cage, suitable for medium size birds and other animals. It compares favorably to $400 cages in pet stores.> Especially notable features are that all 3 cage shelves are "lift-out-able", and two very large doors (on the right side of each level) provide easy access.> The cage is an attractive almost "wrought-iron" pewter color. This "night camouflage" color scheme is also perfect for hiding droppings.> The legs of the cage are rubber tipped--a nice feature if you decide not to use the rollers.QUALITYVery good construction quality. Fair quality-control and sub-assembly. Mine arrived in perfect condition, except for a few barely noticeable dings and a few bent bars (easily straightened). However, the "flanges" which hold up the "lift-out-able" shelves were not well spot-welded. I suspect that after several years of use (and rust) one or more will fail and will have to be reinstalled with screws. Note that this is a moot point with the middle and top shelves anyway, because these shelves are also (optionally) secured with screws.HEIGHT> Some reviewers complain that the cage (at 54" tall) is not as tall as it looks. Actually, the height may be ideal, particularly for parrots. If your parrot is lower than your eye-level, then you are "dominant", and he/she is likely to obey you, otherwise not. It might be coincidental, but my Senegal, which bit me at least once a month when living in a taller cage has not bitten me since I moved him to a similar Prevue FO40 cage a year-and-a-half ago.> The vertical design is convenient for home-owners, but not ideal for birds. Height (elevation) is important to all birds, and socially significant for parrots. Parrots (particularly) will make little use of the bottom half of the cage--unless you place all the appealing toys down there. (But, if you do that, they'll quickly become covered with droppings and therefore become unappealing).BAR SPACING> The horizontal bar spacing of 7/8" limits the cage to medium or larger animals. In the case of birds, that means adult parakeets (budgies) or larger. An great advantage of the larger bar spacing is that you can feed your critter snacks by hand, or scratch its head without opening the cage. I suspect also that your pet has a more pleasant view outward.> The vertical bar spacing of 4 1/2" limits the potential placement of perch poles, and is too far apart for critters (including birds) who like to crawl up the sides of the cages. I'd have preferred a 1 1/2" x 1 1/2" grid.TOP SHELFLike the bottom and middle shelves, the top shelf is "lift-out-able", that allows easy access for cleaning, installing large platforms, etc. The top shelf shelf contains a closable hatch with a 6" x 6" opening, supplied with a sliding door which snap locks closed (if desired). The small hatch provides access for medium size animals to the top, if for example you want to install a playground on top of the cage. The top shelf can very easily be replaced by a 3/8"--1/2" thick sheet of plywood if desired, which would also be "lift-out-able", and could be customized to any design the user desires. Both the middle and top shelf are (optionally) secured in place by two screws each.MIDDLE SHELF> The middle shelf contains a hatch with a 6" x 6" opening, supplied with a removable door. Simply by closing the door, the cage can be converted to two cages (albeit waste will fall from the top to the bottom cage). The size of the hatch which limits the upper size of your pet to ferrets, hamsters, or medium size birds (such as conures, Senegals) etc. The hatch is a bit tight for Amazon parrots, cats, etc.> For larger critters (cats, dogs, rabbits, racoons, Macaws, etc.), you can simply lift out the shelf, but then you'd probably need to add additional platforms or shelves. Alternatively, the shelf can very easily be replaced by a 3/8" thick sheet of plywood (with or without hatches), which would also be lift-out-able, or you could cut a larger hole in the supplied wire shelf.BOTTOM SHELF AND WASTE TRAY> A black plastic waste tray in the bottom slides out for easy cleaning.> The bottom shelf (just above the waste tray) is "lift-out-able", but does NOT slide out (as does the bottom shelf on the very similar Prevue F040 cage).FEEDING TRAYS, DOORS, ETC> The cage is NOT supplied with any feeding/watering trays, so you will need to purchase these separately. (But see "Other Recommended Accessories" below.)> The 485 cage is NOT equipped with feeding doors. However, you can use a skinny spoon to fill feeding trays though the bars.PLATFORMS, PERCHES, AND LADDERS> Some reviewers report that their cages came with metal platforms--but my cage came with plastic platforms. I do not know how well the plastic platforms will stand up to chewing animals (including parrots). The platforms with my cage did NOT have the circular holes shown in the photo.> Perches (20 1/2"-long) can be made from ordinary dowels. I use "Home Depot" "48-inch hardwood dowels". Softwood dowels are quickly destroyed by parrots. Indeed, my Senegal parrot's favorite "chew toys" are 24" softwood ladders. It is best for birds to use a variety of sizes of perch poles, or natural branches which vary in diameter. Caution, many natural branches contain toxins; in general fruit tree wood does not.> Two or more perch poles installed parallel to each other made good platforms. Alternatively, solid platforms can be made with 20" lengths of board, with nails at the corners to act as prongs.> Three plastic ramps were included with the 485 cage, which are probably fine for rodents and ferrets. However, for birds, 2 or 3 standard 24" wooden ladders are good replacements for the ramps.DOORS AND DOOR LOCKS> Some reviewers mistakenly assumed that there are two doors on each of the two levels (a left and a right door). But as the photos clearly show, only the right side on each level is a door. The one large door (on each level) provides excellent access, and the fixed left side provides needed placement points for the platforms (or perch poles) on the left side of the cage.> The stainless steel door locks are a cleaver critter-proof design. However mine did not initial work as designed, mostly because they were poorly manufactured/installed. Simply tightening the screws is a great improvement (so that the screw heads do not interfere with the action). Then a little fiddling with a hammer and pliers restored the locks to their designed functionality. Note however that the locks are NOT childproof and cannot easily be made childproof.ASSEMBLY> As in assembling all such "furniture", initially install the screws loosely (i.e., with perhaps 1/4" remaining to be screwed in), and tighten all when finished.> The instructions are fairly good, and assembly is very simple, but requires some talent at assembling such things.Steps:-- screw leg frames (F1 & B1) to base shelf (C1), and optionally insert the wheels-- insert lower door panel (F2) into top of front leg frame (do NOT install screws)-- insert lower back panel (B2) into top of back leg frame (do NOT install screws)-- install side rails (L1 & R1) with screws (which also secures the bottom of the lower door panel (F2) and the lower back panel (B2))-- place lower side panels (2 of L1, L2, L3 or L4) in place and install screws in bottom of the lower side panels (do NOT install the upper screws)-- insert upper door panel (F3)into top of lower door panel (do NOT install screws)-- insert upper back panel (B3)into top of lower door panel (do NOT install screws)-- install upper screws in the lower side panels (which also secures the bottom of the upper door panel (F3) and upper back panel (B3))-- install (with screws) the upper side panels (2 of L1, L2, L3 or L4)-- install the three cage shelves (C2, C2, and C4), then slide-in the plastic waste tray. The shelves can be "dropped" in place as you build upward, but you should wait on installing the retaining screws on the sides until the last step.> No tools are needed except for the included allen wrench. However, there are alot of screws. An electric screwdriver with a hex bit the right size makes the project much easier.> The cage can be assembled by one person, but a helper can make it easier.> It can be a little difficult to align the screw holes for the top and middle shelves. A large screwdriver can help, to pry the shelf into alignment, so that the holes match upHOW TO IDENTIFY THE COMPONENTS> BASE--The leg frames are [-shaped pieces. The one with the dangling "bell" goes in front (F1), the other is the back (B1)-- The base shelf (C1) (at the very bottom, above the wheels, is the only shelf with holes at each of the 4 corners.-- The side rails (L1 & R1) are the smallest pieces in the box and are obviously rail-line. They are NOT interchangeable. The forward end of each is open; the back end of each is closed.> CAGE SHELVES: The large simple (without plugs) panels are the shelves.-- The middle (C3) and top shelves (C4) have holes on the short sides, the bottom shelf (C2) has no holes.--- The top shelf (C4) has a sliding door built in.--- The middle panel (C3) has a removable swinging door built in.> FRONT DOOR PANELS: Obvious because they are the only panels with doors. Note that the upper and lower door panels are NOT interchangeable.-- The top of the lower door panel (F2) has sockets in the top edge.-- The upper door panel (F3) does not have sockets.> BACK PANELS: The large panels with "plugs" on the bottom side. Note that the upper (B3) and lower (B3) back panels are NOT interchangeable.-- The top of the lower back panel (B2) has sockets in the top edge (into which the "plugs" of the top back panel (B3) fit).-- The upper back panel (B3) does not have sockets.> SIDE PANELS: The small panels (L1, L2, R1 and R2), all are interchangeable, but must be installed with the flange toward the top.> SCREWS: All the screw, except 4 short screws, are the same and interchangeable. The four short screws are to optionally secure the top and middle shelves (which is the last step in assembling the cage).COMPARISON TO THE PERVUE FO40 CAGEI have had a Pervue FO40 cage for several years for my medium-size Senegal parrot. Recently I inherited a Yellow Napped Amazon, and purchased a Prevue 485. The smaller Senegal got the new cage because the platforms and center-platform hatch are a bit small for the Amazon. The 485 is 1 inch taller than the FO40, but otherwise the same dimensions and of similar construction.PROS> The middle shelf of the 485 makes a nice needed large platform (no middle shelf is included in the FO40).> The "lift-out-able" top shelf of the 485 is makes access for cleaning and installing large items (e.g. tree branches, breeding boxes) much easier.> The sliding hatch in the top shelf of the 485 makes easy critter access to the top for playgrounds etc.> The huge front doors of the 485 make easy access or cleaning and installing large items (e.g. tree branches, breeding boxes) much easier.> The small plastic (or maybe metal in some shipments) platforms of the 485 are nice accessories.> The larger bar spacing of the 485 makes it possible to pet your pet's head, and hand-feed him/her without opening the cage.CONS> The slide-out lower platform of the FO40 is much easier to clean.> The feeding doors of the FO40 provide more options for placement of feeding watering dishes (NO feeding doors are included in the 485).> The included perches and feeding trays of the FO40 are a bonus for owners of small birds.> The closer bar spacing of the FO40 is more suitable for small birds (such as finches or lovebirds).OTHER SUGGESTED ACCESSORIES> For feeding/watering cups, I recommend ProSelect ZW991 Stainless Steel Pet Coop Cup Size: 8 oz, which are particularly easy to clean and are parrot-proof. In my experience the best place to install them is on the lower edge of the upper door. Consider installing three, 1 for water, 1 for dry food, and one for wet food (such as fruit and vegies)> I use terra cotta plant dishes as "swimming pools" for my parrots. The terra cotta dishes is actually ideal for the purpose---1) they are too heavy for parrots to lift and dump, 2) evaporation from the sides and bottom keeps the water cool and fresher, and 3) the rough surface is easy for bird feet to grip.> I use a cardboard boxes (with a hole cut in front) as "breeding boxes" in which my parrots can hide in to sleep, or to get out of the wind, (or destroy for fun) etc.> Several 24" wooden ladders are a good addition> I suggest covering the top with a green or black towel---birds instinctively fear attack from above---and are most comfortable with a ceiling.GENERAL ADVICE TO PARROT OWNERSIf your parrot is in a particularly uncooperative mood, stand on a short stool---the taller you are, the more "authority" you have. Once you've got the parrot, tightly wrap him up in a towel for at least 15 minutes while holding, stroking, and cooing to the towel---that regresses your parrot to the "baby" mode (smothered under mama's wing), and will make him/her more compliant. Even if your bird does not have the opportunity to fly, he knows he can (or not)---a wing-clipping can also regress an aggressive parrot back to "helpless" baby mode.IMPROVEMENTS TO THE DESIGNS> The platforms (and cage shelves) would be better redesigned as smaller versions of the shelves (for example, 1/3 the width of the shelves), which would allow waste to fall through and the metal construction would make them chewing critter-proof. Three 1/3-width "platform shelves" could also replace the cage shelves, and make the design much more versatile. Such "platform shelves" would eliminate the need for hatches. For example, 1 (of the three) platforms forming a shelf could be lifted out to serve as passageway between levels. This redesign would reduce the number of different shelf and platform components from 4 to 1.> The "flanges" could be replaced by projecting "prongs" at the corners of the platform-shelf units, which would allow them to be placed anywhere there is a horizontal bar in the cage (6 potential levels), eliminating the need for the "flanges", which seem to be a manufacturing problem with the 485 anyway. Such a design would increase the versatility, the cage could be divided vertically at any level desired.> Both cages (the FO40 and 485) could be improved by redesigning them with slide-out waste trays at BOTH the middle and bottom positions (even if the middle waste tray is an optional accessory). That would allow either cage to be instantly convertible into two complete cages.> The "side rails" which support the waste tray should be replaced with a single "retainer" element. This would allow the construction of the upper and lower portions to be identical, reducing the number of different components from 6 to 3. Assembly would be easier and more logical. The extra waste tray and extra waste tray retainer could be optional accessories.> Plugs (up and down) built into the corners of the "retainer elements" to connect the upper and lower levels would allow the side and back panels to be vertically symmetrical and interchangeable, greatly simplifying assembly. The door panels would also be interchangeable, albeit obviously not vertically symmetrical.> If (using the suggestions above) the levels were designed to be identical and interchangeable, essentially identical cages could be sold with 1 level, 2 levels, 3 levels or more---or additional levels could be sold as "accessories" to a base 1-level unit.> Click on “Stoney” just below the product title to see my other reviews, or leave a comment to ask a question.
D**N
Bang for your buck
Super easy set up, got most of the work done by myself. Door closure is fine just makes a rattling noise if it’s moving and not locked in place. Cage does have a locking mechanism so I like that. Not super heavy but not too light/flimsy, looks just like the pictures, and has plenty of room. I’d say it’s worth it
L**Y
Awesome!
I'm a first-time ferret owner and did a lot of research before purchasing this cage for the two ferrets I adopted from a rescue. At the time I bought it, Amazon was offering a $50 gift card if I applied for their credit card. I did and received the cage $50 off, which made it really affordable. When the cage arrived, the bottom pan was broken (edge chipped off.) I contacted the seller, who contacted the manufacturer, and a new one was mailed promptly.The cage is roomy enough for my two boys and I plan on adopting another. There are a couple of negatives. The floors are wire, which is not good for little feet. I had a stack of floor tile in the basement. It's not the hard ceramic, but the kind that you can score with a knife and break. I cut the tiles to fit the cage floors and now my boys have pink tiled floors. It's very pretty and if they get too hot, they can cool their little bodies on the tile. I'd also ordered two chinchilla chillers for them to lay on if they become hot, but have never even used them because the floor tile is adequate. Only the right side cage doors open because the floors attach to the left. That's not a problem for me, especially since one of my fuzzies loves to jump into my arms. This gives him less room to launch! I clipped plexiglass pieces where the food bowl and water bowl is located to keep the residue off my wall when they take a drink and sling their heads. The ramps are metal (the older version of the cage had plastic ramps) and they're a little slick. I solved this problem by making my own ramp covers with some fabric I bought on sale at walmart.The cage is excellent for the money, but a pain to assemble. I'm a female and did it by myself, but it took over two hours because I had to take several sections apart and redo as I went. One thing that I did wrong that I've not fixed and won't because it takes too long is that my pan slides out from the back of the cage instead of the front, so watch out for that when assembling. It makes no difference to me because I don't use it anyway since I have tile on the floor. It's all a breeze to clean with a little vinegar water on a paper towel and doesn't hold odor like some cages. Would I buy it again? In a heartbeat.UPDATE TO ABOVE REVIEWI've owned this cage for a year now and it's time for an update. I have very active male ferrets. This cage may be okay if you have mild mannered or older ferrets who just putter around. My boys have broken two of the cage bars and escaped. The bars are flimsy on this cage and I can no longer recommend it except for the most docile ferrets. I've ordered a Ferret Nation cage, which is what I should have bought to start with but I was a new ferret owner and it's so expensive getting started.