
✨ Elevate your kitchen vibe with timeless satin sophistication!
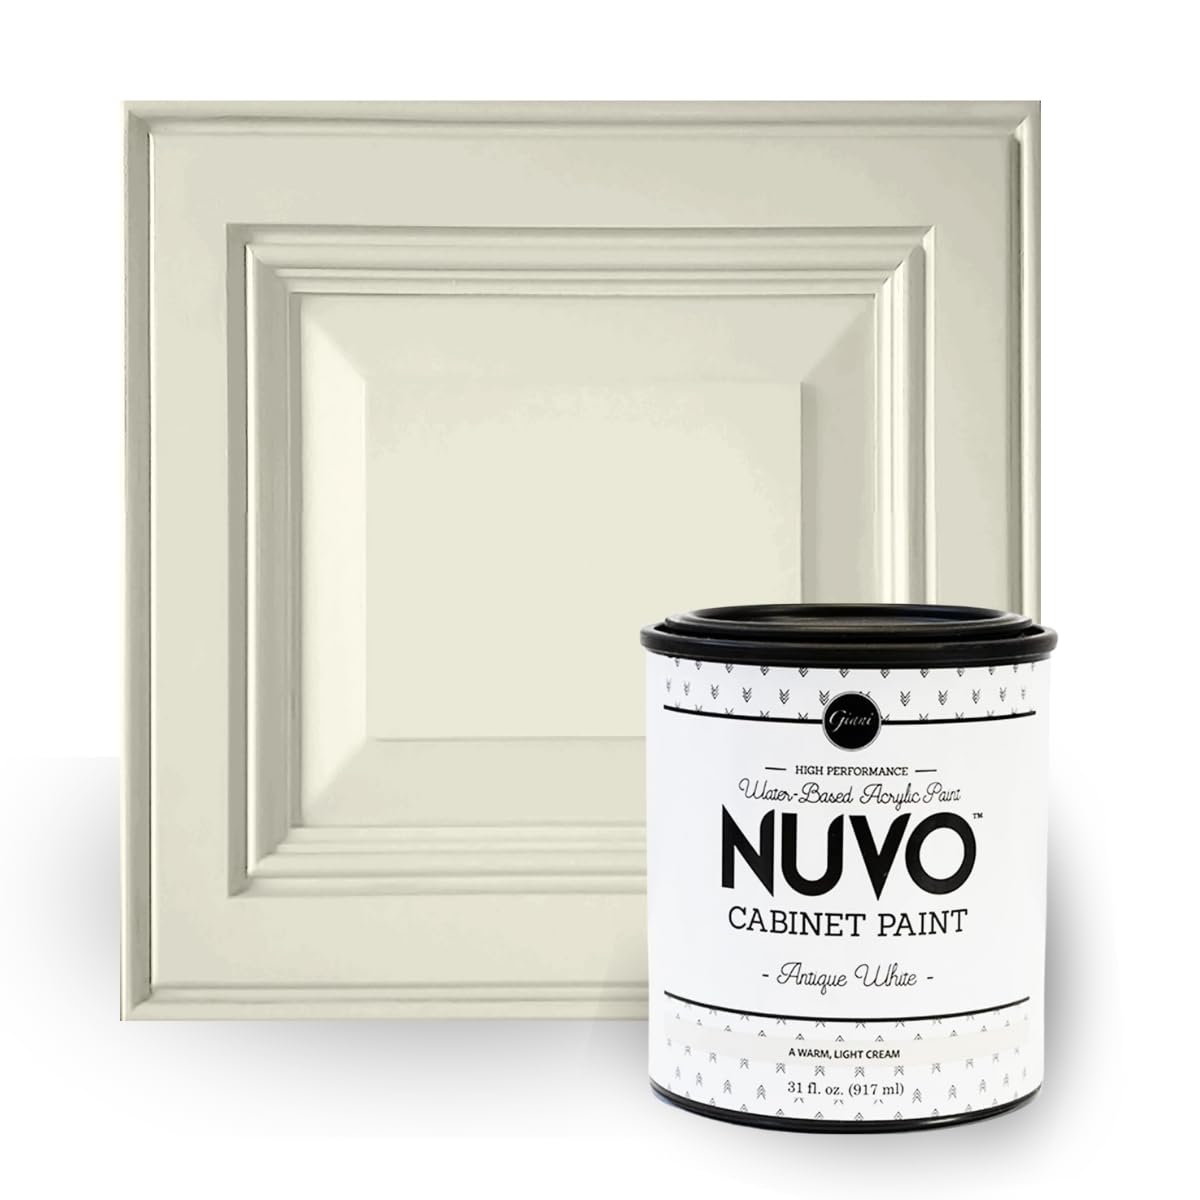
Nuvo Cabinet Paint in Antique White is a 31 oz quart of water-based acrylic paint offering a satin finish that covers approximately 50 sq ft. Designed for easy DIY cabinet makeovers without removal or priming, it delivers a durable, low-odor, and low-VOC solution that adapts to your kitchen’s lighting for a versatile rustic look.


| Brand | Giani |
| Color | Antique White |
| Finish Type | Satin |
| Item Volume | 31 Fluid Ounces |
| Size | 31 Fl Oz (Pack of 1) |
| Special Feature | Low Odor |
M**T
Three Years and Still Looks Fantastic
I used the Nuvo Driftwood Cabinet Makeover Kit on the cabinets in my 5th wheel about 3 years ago, and they still look just as good as the day I painted them. No peeling, no chipping, no fading — the finish has held up perfectly through travel, temperature changes, and daily use. We did take the time to prep the cabinet surfaces thoroughly before painting, and I think that made all the difference. The kit was easy to use, the color is beautiful, and the coverage was excellent. If you’re willing to put in the prep work, this paint will give you a professional-looking finish that lasts.
R**I
Best paint ever!
I recently started DIY painting and decided to tackle my old honey oak outdated cabinet. I bought this paint because of the reviews and I absolutely love it! It was so easy to use and looks amazing! Love the result I am now going to go big and paint my kitchen cabinets! This is the Earl Gray color, before and after.
B**N
Great Product
I recently purchased the Nuvo Cabinet Paint Kit in Cocoa Couture and I am very pleased with my purchase. So far, I have repainted my bathroom vanity and this paint changed the looks of it dramatically. The vanity was once outdated and somewhat boring, and now it looks like a brand-new vanity. I added silver handles to all the drawers and cabinets and that really made the cocoa color of the paint “pop”. I am currently working on painting my kitchen cabinets as well. The Nuvo paint kit includes two paint cans, both one-quart, a small paintbrush for detailed areas, a roller handle and two brush rollers, a stir-stick, and a how-to booklet. This paint goes on with ease and covers very well. I used two coats of paint on my bathroom vanity and haven’t even used half of one can yet. I believe I will have enough to paint my kitchen cabinets as well as the vanity in our guest bathroom. When I first received the kit, I did not realize that I would need a stripping agent for the cabinets. After I read the instructions, I learned that they recommend the use of TSP (Trisodium Phosphate Substitute) to clean the cabinets before applying the paint. I purchased Klean-Strip no rinse TSP from amazon and it worked very well. I simply diluted the solution in warm water and used it to clean the cabinets. It takes a few minutes to try, then you use a dry cloth to remove any residue. After using the TSP, I used a 300-grit sandpaper to lightly sand the cabinets. I highly recommend this step because the cabinet paint will show any blemishes in the wood. For example, the clear coat on my cabinets was not applied smoothly, there were some areas where you could see some drip spots, and the paint made these spots more noticeable. After realizing this, I resulted to sanding the cabinets more thoroughly to ensure no blemishes would be seen. This paint dries very quickly. I painted my bathroom vanity in only a couple of hours- I let the first coat of paint dry for an hour before applying another coat. After only 10-15 minutes of applying paint the cabinets felt dry to the touch. A kitchen or bathroom cabinet make-over can easily be done in a single weekend! I think it would even work well on other wood furniture such as desks, dressers, tables, etc. as it is very durable. I accidently scraped the vanity with one of the drawers and it did not leave a mark.
S**A
excellent paint product.
This paint is excellent. I have old kitchen cabinets and they look brand new. The color is very realistic and the quality of the paint and ease of application was great. Just a light sanding and cleaning of under layer but the paint does all the work. Very nice product.
C**Z
Take your time to prep! Pay attention to drips, and get a good quality, brush or roller.
I did a lot of research on this paint brand and what kind of prep was required before jumping into my kitchen project. A friend of mine had recently used this paint on her kitchen in the summer and raved about the quality and ease of use. I have to say the paint quality is amazing. I think based on your prepping methods, painting methods, condition of surfaces pre-paint and then waiting for time to cure, are all equally important for results when using this product. My cabinets are original to the house, built in ‘86. They are oak, had the original stain/finish, and not properly cleaned in close to a decade. Needless to say, we had to do quite a bit of cleaning before we could prep cabinets. Just using Windex or an ammonia based cleaner was not sufficient for the task. There were lots of areas where the finish was worn through in heavy use areas, so we choose to sand prior to painting so we had even surfaces. I used titanium white on the top cabinets, and old sage on the bottom. I noticed that due to sanding, the white paint really seemed to soak into the wood. I have a total of six cabinets up top and it took the entire pint to paint all of them. Each cabinet face took 3 or more coats. The green color on the bottom took 2 coats on all surfaces. I used 2 pints for the entire rest of the kitchen. My only note about the Old Sage color; when you shake/mix your paint, make sure every surface you can paint in 20 minutes is ready to go. You will have to stop and remix your color. There is a chance the colors will not match, or you will have unmixed color lines if you need to do touchups. I struggled with this problem and consistently had to repaint the large side of the cabinets. Brush versus roller; With this paint, small or thin areas with a good quality brush is definitely best. Large or broad areas is best with a roller. This was true for both paint colors. I will update my review in six months to see how they hold up.
A**R
Great paint..as long as you don't buy returns!
This is INCREDABLE paint ! Used it numerous times on reno. BUT DO NOT BUY the discounted returns!! Idiots buy and use then add water and return!! I made that mistake! The paint texture is suppose to be very thick...my return purchase was thinner than pancake batter! Live and learn! Buy the full price brand new item, you won't be disappointed!
H**9
Prep correctly by sanding for best results
Edit : 4-2020 After a couple of years in the my kitchen , I decided to pay my rennovated master bath cabinets with this nuvo hearthstone . Just wanted to say, I still love the color and still love how is it compliments the bright, calm paint I have in there. ----++++ II have used this on a couple of different pieces and it's been about a month so I think I can comfortably write a review for it. I recently did a kitchen renovation - Had a red walls and the ugly generic oak colored cabinets. I wanted to brightened the room and use very light grey for walls and when I was shopping for cabinet paint, I ran across this on Amazon. I figured this hearthstone color would best match the wall color I was going with. This paint is really good considering its price point and how much it covers. I used all of it for my kitchen project as I was doing both the upper and lower cabinets. I sanded the upper cabinets and did the vinegar/water mix for the bottom set. I did not want to use TSP. In hindsight, I should have sanded all the cabinets. After using them for a month now, I noticed that the sanded cabinets was able to grip on the paint much better. Also it was easier to paint the sanded cabinets; the bottom ones tended to form those tiny bubbles much easier. Also scratched the bottom ones on a couple of occasion with finger nails or pesky little pointy objects like forks etc...while opening them. I touched them up and all is good now, but I really do think this is due to me not prepping it correctly. Some of these tips may have been already given by other reviewers but being this was my first cabinet pain project, these were most helpful in completing the project i.m.o. - Unscrew the bottom cabinet door sets first - Paint one side of them - Then unscrew the top cabinet sets (this allows for about an hour dry time for the first side coat) - Paint first side of top cabinet sets - Turn over the bottom set and paint them (this allows time for top set to dry) - Put second coat on top cabinet set - Then paint other side of bottom set (you get the point- This allows you to work continuously without having to wait for dry time) - Always sand i.m.o or use TSP - These cabinet i Had were 11 years old and the vinegar trick cleaned them good...free of dirt and grease etc... but I feel like it didn't adhere to the paint as well as the sanded ones - They look identical, but I am talking about when you really use them and make contact with the paint afterwards - Stir the can of Nuvo paint and mix it well for a good 5 minutes. - The roller that comes with the kit works ok. Make sure not put too much paint on it, especially at the beginning. It will form bubles and creat that "water spot" look once those bubbles pop and paint dries - I have found that the sponge roller made for cabinets and smooth surfaces work a little better with this. If anything you can do first coat with the one in the kit, and put the top coat with the foam. Also for corners, the brush work ok, but I have found those black foam ones are easier to work with. While I was at it, I added a rolling island in the kitchen, and the bamboo color stuck out like a sore thumb. So I painted it with the same Nuvo paint. Looks great and matches well. I plan on painting another old cabinet we bought from someone online. Definitely will be sanding it before putting this paint on. All in all, I am satisfied with the product and this color went really well with my new wall color.
V**Y
TERRIFIC PAINT!!!
This is outstanding paint if it's applied the right way. It has the same sheen as more expensive cabinets. After I had read all the reviews on this paint especially the ones where the paint peeled of easily and the finger marks left if it were touched so I was able to learn from the mistakes of others. Forget what the company said about being able to apply this paint on top of old surfaces. Paint is paint and it needs something to grab on too. Any manufacturer of paint will tell you the same basic rules wash of dirt and dust, sand the area blah blah blah if you want your hard work to come out right follow the basics but I might have been tempted too if a manufacturer told me there's no need to sand the cabinet. I had a complete disaster spray painting cabinets black I also sprayed the walls, floor windows and put several coats on thinking the more the better ,my job was ruined. With this job I sanded the cabinet until I got rid of ALL the gloss and it took a lot of Sanding to get rid of the gloss , these cabinets receive 7-9 coats in the Factory so keep that in mind. I used an orbital sander plus elbow grease and washed the cabinets between Sanding the final one I left the cabinet damp because the wet opens up the wood pores and applied a thin coat with a sponge roller and let it dry for a about 10 hours then applied a second coat without Sanding between coats and the results are spectacular. I am delighted with the result. I have a hard finish I tried to scratch off paint with my nail.... nothing, I rubbed my fingers all over it... no fingermarks. This is great paint if you follow the rules of painting. I plan on putting the cabinet on pinterist under my email [email protected] because I added another detail to my cabinet. I bought a roll of paintable beadboard wallpaper cut it out and pasted it to the insert of the cabinet, waited 12 hours and applied 2 coats of the Nuvo paint. I swear you would think they came from the Factory that way .I bought these old oak cabs of Craiglist for a bargain , now I can match them up with my black Ikea cabs because they discontinued the cabs I had so this is even better.The whole cost was $20.00 including the cabinet.


