


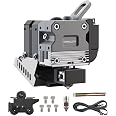
Creality CR Touch Auto Bed Leveling Sensor,2023 Upgrade Noiseless Auto Bed Level Kit for 32 bit 4.2.2 &4.2.7 Motherboard,Fit for Ender 3/Ender 3 Pro/Ender 3 V2/ Ender 3 Max/Ender 5/Ender 5 Pro/CR 10
细节
- BrandYOOPAI
- MaterialMetal
- ColorBlack
- UPC601549513862
- Unit Count1.0 Count


描述
🔍 Level Up Your Printing Game!
- PRECISION PERFECTED - Experience leveling accuracy of ≤0.04mm for flawless prints.
- EFFORTLESS INSTALLATION - Includes multiple mounting options and easy firmware updates for quick setup.
- UNIVERSAL COMPATIBILITY - Seamlessly fits Ender 3 series and CR-10 printers for versatile use.
- WHISPER QUIET OPERATION - Enjoy noiseless auto bed leveling with innovative silicone design.
- SMART MULTI POINT DETECTION - Automatically compensates for tilt angles, ensuring a perfect first layer.
The Creality CR Touch Auto Bed Leveling Sensor is a cutting-edge upgrade for 3D printers, featuring a durable metal probe and advanced noise-reducing technology. With an impressive positioning accuracy of ≤0.04mm and compatibility with various Creality models, this sensor ensures optimal performance and longevity, making it an essential tool for any serious 3D printing enthusiast.


评论
J**
Great investment
This was a great buy for the money, very easy to install and it perform great. Very durable and help with print quality by making sure you're level. It doesn't help with any adhesion to the bed but it will help keep you level and in tune.
R**0
Makes 3D printing a bit easier for some
If your Creality 3D printer does not have auto leveling, AND the printer support a CL Touch or BL Touch, this is a great addition. Note that adding this auto leveler, or any auto leveler, will likely require that one updates/flashes the firmware on the 3D printer. While CR Touch likely works with older Creality printers, some very early models had a control board that requires additional cables and steps to make it work. Prior to purchasing a CL Touch or BL Touch make verify the installation steps.
D**R
Original CR-10 w/CR Touch
Used with Creality firmware: "CR-10-Marlin2.0.1-20201207-HW-V4.2.7-SW-V1.1.1 BL touch-English.bin". Seems to work. This is for their v4.2.7 32 bit silent stepper board.The probe offset did not work as instructed (manual ridiculously small). For me, at the status screen after homing z is shown as 10. To get your offset, you have to move z to 0, then see how much further you need to go to get to resistance with the paper test, in my case 1.9mm. So for me the probe offset needs to be -1.9mm, save that setting. So if I home the CR-10 now, Z is shown as 11.9. Prints fine.I'm not certain the CR touch is necessary as I have the stronger springs and White wheels to adjust, I marked them for level. They do move on a long print but if you return the marks to their correct spot, level is always correct, can be done during the print as well.Might use the silicone support columns or not.Just figured if I'm going to dig into it...
M**E
Easy to install, difficult to update firmware for new folks.
I bought this to help improve print quality. It does help. It does its job. But the part that I found frustrating with this was the firmware update. No videos currently help in the new software update, there are links that lead you to where the software is. But the naming convention doesn't make it easy to find, once you get it, the set up and all that is done by the machine, just be careful because you can download the wrong files.
M**S
Junk
Instructions for CR-10 series is virtually non-existent. Had to resort to forums and online videos made by amateurs for help. Once installed, firmware needs to be acquired. Creality makes it difficult to find on their site. When you do find it, it's on GOOGLE DRIVE. Really?!? Creality can't afford to host its own files?Then you learn on a CR10 series you have to flash via USB cable, not SD. Not a problem, except the cheap USB chipsets/adaptors they use have very temperamental drivers and might recognise the connection about 1 in 30 times. Finally. We're flashed, but...There is something wrong with Creality's current firmware for the CR Touch. That's right; Creality's own updated for 2022 product doesn't even have properly working firmware for the CR10 series! When you set your Z offset, it will store, but not register when doing any movements or printing. After some research I found this is a known issue that has been brought up by the community for quite a while and nothing is being done about it by Creality. So thankfully, some frustrated individuals came up with their own firmware solution that actually works.So it is flashed and working now, but when I removed the USB cable for the last time, the board's USB adaptor snapped off, meaning now whatever is there is forever. A nice visual analogy and summary to the quality I have experienced from Creality.Never again.So next time you have $400 and some change lying around, don't buy one of these garbage Chinese printers.Just find someone special to take out on a really nice date instead.
B**N
Great
Great quality good adhesion good print quality
M**Y
Great once it's set up
I can't speak for the instructions because I didn't read them at all; the booklet was too small for my middle-aged eyes. I installed this on an Ender 3 V2, and found a good YT tutorial for exactly that, so that's how I did the installation. That was really easy and took...oh, probably half an hour total. Then came the "fun" part of the Z-axis offset, and you betcha those are sarcasm quotes because it was *not* fun! Just when I'd think I had it perfect, I'd do a test print, and something was off on one side or a corner, or whatever, and I'd have to start all over again. I almost gave up; it took me *ages* and a lot of words I wouldn't have said in front of my grandmother to get it right (my offset is 1.40, FWIW), but now that it is, it prints beautifully.
C**P
Tiny spacers
I thought the spacers we the regular size ones. In fact I thought they didn't send them at first.the part is the official creality one though.
