

⚡ Brighten smarter, save bigger — light up your space like a pro!
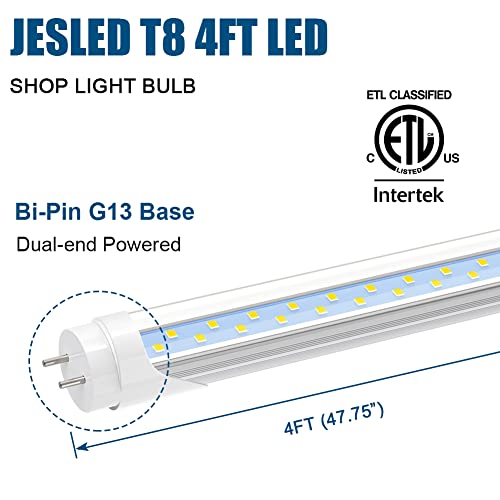
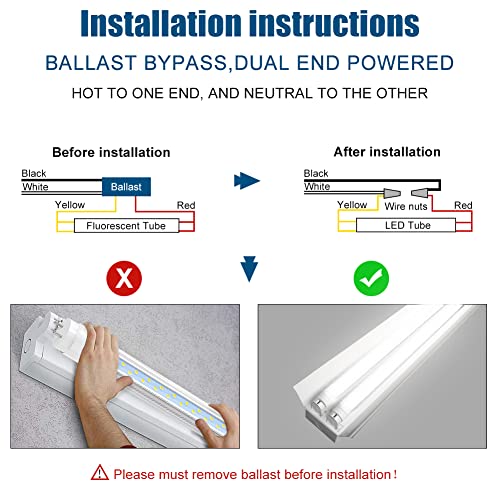
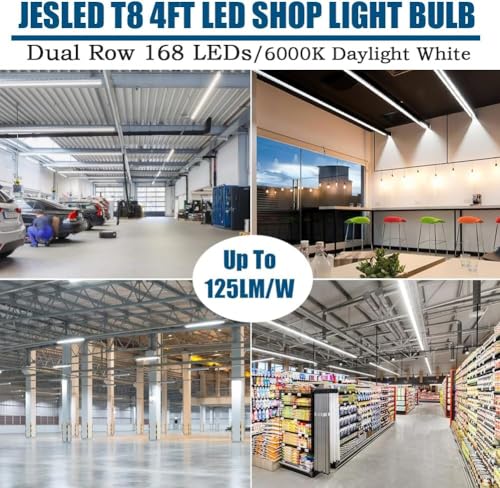
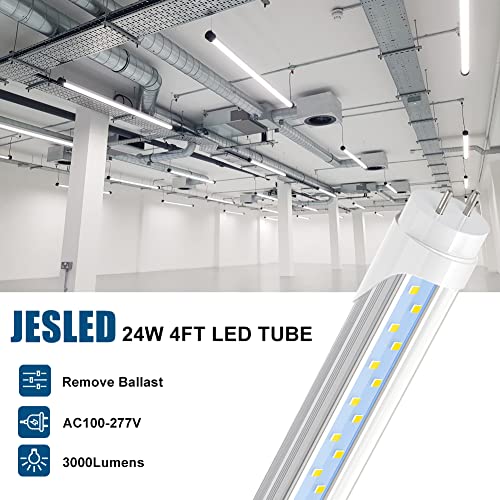
The JESLED T8 4FT LED tube is a high-output, energy-efficient fluorescent replacement delivering 3200 lumens at 6000K cool white. With a 24W power draw equivalent to 65W fluorescents, it offers instant-on brightness and a 50,000-hour lifespan. Its dual-ended design supports both Plug & Play and ballast bypass installations, making upgrades fast and flexible. ETL listed and mercury-free, it’s a durable, eco-friendly lighting solution ideal for offices, workshops, and modern homes.


| ASIN | B074M8X8CV |
| Accepted voltage frequency | 100 to 120 Volts and 60 Hertz |
| Average Life | 50000 Hours |
| Batteries Included? | No |
| Batteries Required? | No |
| Best Sellers Rank | #4,091 in Industrial & Scientific ( See Top 100 in Industrial & Scientific ) #352 in LED Bulbs |
| Brand | JESLED |
| Brightness | 3200.00 |
| Bulb Base | G13 |
| Bulb Shape Size | T8 |
| Color | 6000k (Bright White) |
| Color Rendering Index | 80 |
| Color Temperature | 6500 Kelvin |
| Control Method | App |
| Customer Reviews | 4.4 4.4 out of 5 stars (6,020) |
| Date First Available | May 25, 2018 |
| Efficiency | High |
| Finish types | Clear |
| Incandescent Equivalent Wattage | 65 Watts |
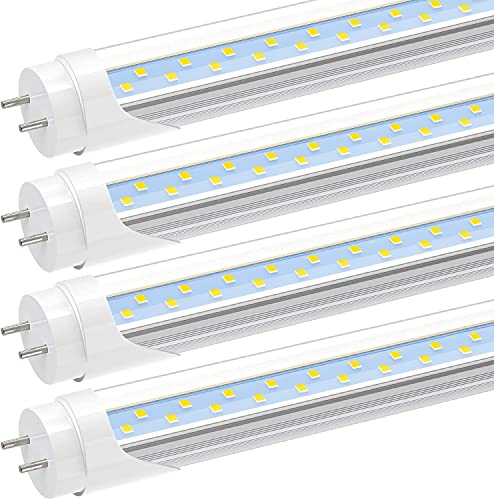
| Included Components | 4-Pack LED Tube Lights |
| Indoor/Outdoor Usage | Indoor |
| Is Discontinued By Manufacturer | No |
| Item Package Quantity | 1 |
| Item Weight | 2.79 pounds |
| Item model number | JW-T8G13TCA2-24CW |
| Light Color | Cool White |
| Light Output Maximum | 3000 Lumens |
| Light Source Type | LED |
| Light Source Wattage | 24 Watts |
| Light Type | LED |
| Manufacturer | JESLED Lighting |
| Material | Acrylonitrile Butadiene Styrene (ABS), Metal |
| Number of Items | 1 |
| Package Dimensions | 49 x 3 x 3 inches |
| Part Number | JW-T8G13TCA2-24CW |
| Power Consumption | 24 Watts |
| Power Source | Corded Electric |
| Shape | Tubular(T) |
| Special Feature | (1)Instant on, Non- dimmable;(2)Dual-end Powered Bi-pin G13 base;(3)Plug and Play or Ballast Bypass installation;(4)Bright, high output up 3200+lumens;(5)50,000+ hour lifetime;(6)Durable, shatterproof construction;(7)No UV or IR radiation;(8)Does not contain mercury. |
| Special Features | (1)Instant on, Non- dimmable;(2)Dual-end Powered Bi-pin G13 base;(3)Plug and Play or Ballast Bypass installation;(4)Bright, high output up 3200+lumens;(5)50,000+ hour lifetime;(6)Durable, shatterproof construction;(7)No UV or IR radiation;(8)Does not contain mercury. |
| Specific Uses For Product | Lighting |
| Specification Met | ETL |
| Style | 4FT-4Pack |
| UPC | 742354664599 |
| Unit Count | 4 Count |
| Voltage | 100277 Volts (AC) |
| Wattage | 24 Watts |
| White Brightness | 3000 Lumens |
R**O
Great Lights! Slightly Tricky Install
These LED tubes are great replacement bulbs for fluorescent fixtures that need either bulbs or ballasts since, once installed correctly, you will likely never have to replace them again in your lifetime (unless you're a teenager!). These are especially useful if your fluorescent ballast has gone bad, since a new ballast alone could cost you more than a couple of these new LED bulbs, and the ballast is completely disconnected and bypassed (I removed mine), thus eliminating the most "inefficient" device in your lighting fixture. Fluorescent lights were long considered to be the most energy-efficient lighting option available, and they were efficient--when compared to standard incandescent lights. But the ballast, which is necessary for fluorescent lights, is the most inefficient part of that lighting system and, although to a lesser extent than incandescent lighting, still converts a lot of electrical energy into unwanted heat. With the technological advances in these new LED tubes, you can toss those energy-wasting ballasts (which often go bad, themselves, requiring expensive replacement) and use your same fixtures with new LED technology that further reduces the energy lost to heat and much more efficiently converts electricity into just the light that you're wanting from a light source. Unless you're keeping small animals warm or trying to keep the dampness out of the inside of your piano, there's not much need for incandescent light bulbs anymore! These particular LED tubes are very bright, and possibly bright enough that you may find that you only need half as many of the LED "bulbs" installed as compared to your old fluorescent "bulbs"! (I replaced four fluorescent tubes in my laundry room with these LED tubes in the same fixture, and I had to remove three of the new tubes because it was way too bright! I have MORE than enough light with JUST ONE LED TUBE!!!) Also, unlike those old fluorescent lights which normally lost much of their brightness after a while, these LED lights will continue to maintain their light levels for years to come, all the while saving you small change day after day after day--and all those days add up to lots of dollars over the extremely long lifespan of these "bulbs"! BEFORE YOU ATTEMPT ANY OF THE FOLLOWING PROCEDURES, BE SURE YOU ARE KNOWLEDGEABLE ENOUGH AND CAPABLE OF WORKING WITH HOUSEHOLD WIRING! ELECTRICITY CAN BE DEADLY IF PROPER PROCEDURES ARE NOT FOLLOWED!!! Now for the technical stuff: These particular LED tubes are a direct replacement for old T-8 or T-12 fluorescent bulbs, and fit perfectly in standard sized fluorescent fixtures that have been MODIFIED INTERNALLY. While some LED fluorescent replacement tubes are designed to be used with a fluorescent ballast (why would you want to?), these LED "bulbs" are NOT designed to be used in fluorescent fixtures that still contain a ballast wired into the circuitry, and should NOT be used to directly replace fluorescent tube "bulbs" in an unmodified fluorescent light fixture! Before you begin installation, be sure to go to your electrical breaker box and turn off the circuit breaker that supplies the light fixture before you open the fixture housing. Then bypass the ballast (remove it from the circuit) or remove it completely from the fixture; the only things you will need to keep from your original light are the fixture itself and the "tombstones" (that hold the bulbs). If the existing wires inside the fixture are not long enough after removing the ballast, you may need to supply more wire to finish the job. ***FOLLOW THE WIRING DIAGRAM THAT COMES WITH THESE LIGHTS, because NOT ALL LED REPLACEMENT TUBES FOR FLUORESCENT FIXTURES ARE THE SAME!!!*** (Some are wired from just one end, but these are NOT THAT TYPE. Unfortunately, there seems to be no "standard" configuration established yet.) Also, the two contact pins on each end of these tubes are apparently not connected, so just because you have one service wire connected to each end "tombstone" (bulb retainer), unless your wires are connected to the proper side of each "tombstone" on each end, you may not close the circuit and the bulb may not light up--don't assume the bulb is faulty. I recommend that you remove the tombstones from the fixture (they usually just slide off) and temporarily wire them to an old power cord (don't plug it in until you're ready to test the wiring), then attach the tombstones to the new bulbs. After making sure all conducting parts (uninsulated wiring, etc.) are safely away from any conducting material (including flooring), plug the power cord into a wall outlet. If all the bulbs do not light up, unplug the power cord and reroute the tombstone wiring or use "jumpers" to supply electricity to the unpowered sides of the tombstones. Then plug the temporary power cord in and try again. Once all LED tubes light properly, be sure to secure the tombstone bulb clips into the fixture in the same correct orientation. DO NOT handle the disassembled fixture parts while the temporary power cord is still plugged into the electrical outlet! BE CAREFUL! Don't let fiddling with the light fixture's "tombstones" lead to you earning a tombstone of your own! ;)
J**N
Easy to install and very bright. Feel a little flimsy.
I purchased these on behalf of a relative. I did my first every ballast bypass after watching multiple videos. I knew very little about lighting, though I was confident in wiring outlets and pulling wire. Here is the pertinent info. This is specifically for ASIN: B074M8KCJ1. I know how amazon likes to lump reviews. These are LED bulbs that replace a T8 or T12 florescent tube, and remove the ballast all together. The difference between the T8 and T12 is a 1/2" difference in tube diameter and a magnetic ballast vs an electric one. This doesn't matter to install these bulbs. They fit a 4' fixture. Something to note, as I found out, is that while most LED replacements are single ended for power, these are dual ended, which is more rare. What this means is that on most, you run the power and the neutral to a single end. The power would go to one prong and the neutral to the other. In contrast, these are dual ended and you run power to one end of the bulb and neutral to the opposite end. As far as installing them, I spent 20min and made two mistakes on the first one. Once I was familiar, it took maybe 10min to install the second set. On the first install, two tombstones were broken, so I replaced all four. The tombstone or keyway are the little pieces that the prongs go into when installing the bulb. If you hold them rightside up, they look like tombstones. I found them cheaply at my local big box in sets of two. I spent maybe $10 for 8 total. If you can use the existing tombstones or are replacing them, you can use the wire attached to the ballast. I believe it's 18ga. For safety sake, shut off the breaker to the fixture you're working on. I'm absolutely not saying that shutting off the light switch also breaks the power and that you shouldn't be touching live wires. For safety, just shut the breaker and the light switch off. Once that was done, I cut the wires as close to the ballast as possible, and removed it from the fixture. You can leave it, but it's just scrap after this. This gives you as much wire as possible to work with. Here is where a little guess work came in on my part. The diagram provided on the amazon page only showed one wire leading to one end. So that's how I wired it. I couldn't get answers anywhere else. I removed all the tombstones from both fixtures, because this was being installed in a barn and I wanted to make sure they were in good condition. The ones in the first fixture were all damaged, so I replaced them. the ones in the second fixture looked good, so I simply blew all the dust off and reused them. I only used one wire on the first fixture, so even though I had two wires to each tombstone on the second one, I cut one as flush as possible and left it alone. If you're using a new tombstone, strip ~1/2" off the end going in the tombstone and just push it in. Be warned that once you push it in, it's in for good. Think chinese finger trap. On the other end, strip ~1 of wire. Another thing I didn't know when putting only one wire to each end was whether it mattered if I powered the pins on the same side. These bulbs were labeled as working with shunted and non-shunted tombstones. I had to look that up. Basically, with a shunted tombstone, the power goes to both sides. It'll power both pins with one power wire. With a non-shunted, it only powers the side you add a wire to. So if you want both sides powered, you need to run a wire to both sides. In the interested of "it'll work either way" I added/kept the wires that would be to the outside of the fixture on both sides. I didn't know what would happen if I powered the outside pin on a bulb, on one side, then ran neutral to the inside pin on the other side of the same bulb. Running them in a line worked, so that's my suggestion unless someone says different. One you have the wires pushed into the tombstones, reassemble the fixture, minus the cover for the ballast and wires. Tuck them up so they don't get pinched when you put the cover back on. Before you tuck and cover, you need to attach it to the power. This is pretty much going to be a standard 12/2 wire. That's a 12ga wire with two lines in addition to the ground. If you run into a 12/3, which I did recently, just pay attention to which wires were used to power the ballast before. Any wires you aren't using should be trimmed flush to the tombstone or put a wire nut and maybe some electrical tape on them for saftey. Wire the neutral first by picking the two wired ends (one from each bulb), and placing them inline with the white neutral power wire, with the ends even. Grip by the insulated covers. Push on a wire nut and keep twisting till it stops. Give it a tug to make sure it's solid. Now repeat on the hot wire. Grab the wires from the opposite end of the bulbs and wire them to the hot. Once this is done, you're theoretically up and running. I recommend that before you seal it all up, you test it. Install one or all of the bulbs and then turn your breaker on. Then your switch. it should light up. If it does, then remove the bulbs, tuck the wires, reinstall the cover, and reinstall the bulbs. You should be good to go. As far as the bulbs themselves. I got the brightest ones for the stalls and grain room. They are brighter than the previous florescent bulbs. They don't have a diffuser, meaning a frosted covering to make the light go in all directions, but they cover what I believe is a 12'x12' stall easily, from a height of ~9-10'. The fit is tight. I had to push on the tombstone slightly to get them to fit in. The position of the tombstone is slightly adjustable so maybe I just had them in too far. The bulbs themselves are pretty flimsy. They have hard plastic on the ends with the pins. There is an LED light strip down the center. The "cover" that makes it round is just stiff, clear plastic. I felt I could pretty easily crush it and didn't even feel I could push on it to help guide the pins into the tombstones the way I would with even the glass bulbs. Instead, I pushed on the hard plastic ends. Having said that, I don't plan on handling them regularly. Once they're installed, I don't see any issue with this flimsiness. In fact, if they ever get scuffed, damaged, or dirty to the point of affecting light quality, I don't see why you couldn't just remove the plastic and let them be exposed. They're already not rated to be in super wet environments, so I don't see where it would matter. Anyway, I've been using them maybe 30min a day as I feed. They come on instantaneously and are very bright. I saw a review where someone said they were failing after a couple of years or something. I guess we'll see if that's all of them or a batch. Even if they do fail after 2 years, that's still less time than the ballasts lasted and replacing the bulbs is much easier and cheaper than replacing the ballasts when they go out. Ideally, you'd just start with LED fixtures, but this is a good product for those making a transition.
S**I
Very good. Bright, durable and good for replace fluorescent tubs
L**A
This was a piece of cake to install. Removing the ballast was very easy! Very bright and white!
G**H
gutes Licht
R**M
Thank you for the recent shipment of 12, 24 W, T-8 LED Tubes. I have finished installing 11 of them with 1 as a spare. They arrived well packaged in perfect condition, they were easy enough to install, (except for removal of a couple of ballasts, but that seems to be the case with other people too) and they work perfectly and provide a much better light in my small shop. Not to mention the savings in electricity costs and no more “buzzing noises.” My only advice: Cut the wires close to the ballast so that enough wiring remains to complete the job. I recycled the old ballasts at our local facility. Thank you for a good product, a good price, and a good buying experience.
M**N
I’m very pleased with these lights easy to install it’s like night and day super bright.


