


🛠️ Connect Like a Pro, Test Like a Boss!
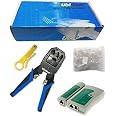
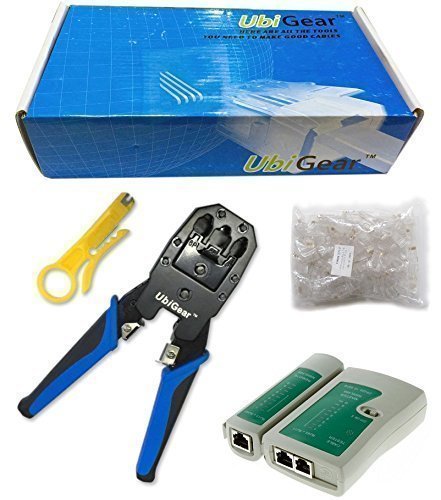
The UbiGear Network/Phone Cable Tester and Crimper Kit is a professional-grade toolset designed for seamless cable installation and testing. Compatible with RJ11, RJ12, RJ22, and RJ45 connectors, it features an intuitive LED tester for quick wiring verification and an ergonomic crimper for precise cable termination. The kit includes 100 CAT5e RJ45 plugs and a wire stripper, making it an all-in-one solution for network technicians and DIY pros alike, backed by a 1-year warranty for peace of mind.
| Brand | UbiGear |
| Color | Gray, Blue, Black |
| Item Weight | 1.35 Pounds |
| Grip Type | Ergonomic |
| UPC | 791090105408 |
| Manufacturer | CAAG Technology Inc |
| Part Number | UNTK002 |
| Item Weight | 1.35 pounds |
| Product Dimensions | 8.5 x 1.5 x 6 inches |
| Item model number | UNTK002 |
| Is Discontinued By Manufacturer | No |
| Style | Circuit Testers |
| Pattern | Crimper315 |
| Power Source | Hand Tool |
| Item Package Quantity | 1 |
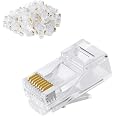
| Included Components | Network/Phone Cable Tester, Network/Phone Cable Crimper, RJ45 CAT5e Connector |
| Batteries Included? | No |
| Batteries Required? | No |
R**O
Good option for creating Ethernet cables.
A great option for creating your own Ethernet cables. Has everything you need except the cable. The continuity tester feels like cheap plastic, but so far it’s held together and does what it’s supposed to.
R**W
Good crimping tool, useless wire stripper
I bought the UbiGear Crimp 315. I have not crimped Cat5e before so there was a learning curve. Fortunately, I have a brother with experience.The yellow wire stripper is useless. When I used it to strip the Cat5e cable it nicked 1 or more wires underneath the outer shield. So I used a small scissors to cut upwards from the end for the length that I needed, then around the cable to reach the wires underneath. I made the mistake of trying to strip the individual wires before inserting them into the clip; not necessary. However, the stripper did a very poor job anyway, either stripping one side of the insulation or cutting through the wire. I have tossed the stripper.The crimper does a very nice job of piercing the wires and making a good connection. Once I understood how to do it, it was fairly easy and each connection worked well. The tester allowed me to separate the units and put one on the second floor and the base on the other end on the first floor. The clips aren't high quality but they work just fine for my needs. I ran the first two wires from 2nd floor, to the attic, down to the crawl space and back up to the first floor. I put the clips on all 4 ends and used the tester to confirm. I connected to my cable box, the Roku box and the Sony Blu-ray player. All connections tested OK and now no more drops from the wireless connection. I'm going to add a switch to one of the wires and run more Cat5e to other first floor rooms.How I did the crimps-Run your wires as necessary in your home-Strip about a half inch of outer insulation from the end of the Cat5e exposing the 4 twisted pairs of wires-Straighten the individual wire pairs and align them according to the T568B or T568A standard (see the included instruction sheet). Whichever you use, always use that through your network. Flatten the pairs of aligned wires, you may need to trim them so they are all the same length.-When you have the wires aligned to the standard, use forceps (or some gentle clip) to flatten and hold them in place-With the retaining tab facing down, push the wires into the end of the clip. You should see the tips of the wires at the other end of the clip. You can look at the edges to see the outer 2 wires. It's very important that you have them ALL THE WAY to the end of the clip-Insert the clip into the center (8P) of the crimper, tab up, careful not to pull the wires out. Squeeze the crimper and the chrome slide will go up to force the gold tabs up into the individual wires, piercing them and making the connection. Depress the tab on the clip and remove it from the crimper-Do the other end of the wire the same way-Separate the 2 pieces of the tester, put the smaller on one end of a new Cat5e clip-Make sure there are batteries in the large tester and put the other end of the Cat5e into it. Move the slide switch to on or s(slow). "G" will light on only one of the testers (OK). Each tester will glow red for each of the numbers 1-8 (4 pair). If any light is missing then the crimp didn't work. (I went through about 6 clips before getting it right. Then the rest were OK on the first try.)Hope this helps someone else.
V**T
Fairly pleased rank amateur
I got the Crimper315 kit a couple of years ago when I was first began ripping out upstairs walls, in hopes that one day the cables I was tacking around the attic and dropping down walls would get connected to ... something. So now, a few years later, I'm hauling out and dusting off this kit and sitting down to reeducate myself about why on earth I bought this stuff and how I'm supposed to use it to hook up an ethernet network. I was incredibly relieved to discover that this kit had nearly every tool I'd need.The tester was super easy to use. It let me check the connectors I was putting on both ends of cat5e cables to ensure they were valid. This in turn let me make a few little test cables and deploy the remote to double check the cables I'd dropped way back when, now that I'd finally punched them into jacks and a patch panel. This reassured me that I could go ahead and tack everything up in the basement -- and that I wouldn't have to crawl back into the attic insulation to replace anything. So for me, the tester was ~huge.~ (Note that it does require a not-provided 5-volt battery.)The crimping tool turned out to be a minor problem. I discovered that squeezing too enthusiastically could ruin the connector. Also, when I looked at the connectors head on, I could see that at least one of the wires consistently seemed to be crimping slightly higher than the others. That said, the tester said they'd work -- and the network I'm using at the moment testifies to that.I'd gotten a separate punching tool (didn't want to gamble on that part), so I only used the cutter portion of the other tool to take off sheathing. It turned out to be sharper than I'd expected, and more than, say, one and a half cautious turns would nick the interior wires. Yow.So, all in all, nearly every tool you'd need to put an inexpensive home network together on a budget. I had zero knowledge of how any of this worked when I dumped out the box, and I'm not planning to get major use out of it in future other than making some custom cable lengths to hook up equipment. So from a strictly amateur, clutching some diagrams, maybe hooking up some equipment once in a blue moon perspective, this kit was a really great value.
Trustpilot
1 month ago
2 months ago