🌟 Elevate Your Temperature Control Game!
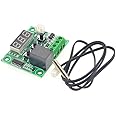
The THEMISTO Clear Acrylic Case Shell Housing with W1209 Digital LED DC 12V Temp Thermostat is a high-performance temperature control switch module designed for precision and versatility. With a control range of -50°C to 110°C and a resolution of 0.1°C, it ensures accurate temperature management. The waterproof NTC sensor and robust acrylic design make it suitable for various applications, from electric baseboard heaters to more complex setups. Lightweight and user-friendly, this device is a must-have for professionals seeking reliability and style.


| Display Type | LED |
| Manufacturer | jipvi tools, JIPVI TOOLS PVT LTD ;Third floorTaishi Plaza GUANZHOU China - 510040;hone number : 9599559766 |
| Manufacturer | jipvi tools |
| Country of Origin | China |
| Model number | AP-R11A134 |
| Number of Memory Sticks | 1 |
| Special Feature | Waterproof |
| Specific Product Use | Electric Baseboard Heater |
| Item Weight | 80 g |
| Product Dimensions | 5 x 5 x 11 cm; 80 g |
| Item model number | AP-R11A134 |
| Item Height | 11 Centimeters |
| Item Width | 50 Millimeters |
| Power Source | Battery Powered |
| Included Components | W1209 With Case |
M**G
Awesome Quality and Performance
Its quality is very good its performance is superb and most importantly its setting point is very stable there is no fluctuation at all If you want to set it above -20 ° then it can be set in points it will not be visible but you can set it by counting and this executive works on the same point
S**R
No datasheet in box or description and it needs calibration
First of all datasheet should be included in box which is not there.Anyways I am including function understanding in image and at the end of this review.I read in one review that it exploded after connecting it with power, there was wrong power connection that I can see in the review's photo so I am clearing this,Supply only 12V DC to the module, there is +12V and GND clearly written on the PCB.You can connect up to 250V 5Amp AC load to it, K0 and K1 is the relay connections for operating the load.The PCB is on thinner side but overall quality is good. Will see how it performs in the long run.The acrylic case comes separate in parts and you need to assemble it.They should provide extra screw-nuts in case there is some problem with threads or someone loses it.It would be great if it operated on 5V DC, we could use a mobile charger as a power supply.There is a need to calibrate the module, mine had +2.3 degree C error, I have one very simple way to calibrate if you have nothing in your home to calibrate the module with.1. Take a medical thermometer, put it in your mouth, take its reading after a minute or two and remember it.2. Put temp. probe in your mouth while module is on, give some time to stable the reading in display.3. See the reading, if does not match with thermometer, use function P4 adjust temp to the correct value (put the diff. b/w display reading and thermometer reading) and match it with thermometer reading (Keep temp probe in your mouth all the time while doing this)4. Calibration is done.Understanding functions:1. Setting the trigger temperature:To set the trigger temperature press the button marked 'SET'. The seven segment display will flash.You can now set a trigger temperature (in oC) using the '+' and '-' buttons in 0.1 degree increments. Ifno buttons are pressed for approximately 2 seconds the trigger temperature will be stored and thedisplay will return back to the current temperature.2. Setting the parameters:To set any parameter first long press the 'SET' button for at least 5 seconds. The seven segmentdisplay should now display 'P0'. This represents parameter P0. Pressing the '+' or '-' buttons will cyclethough the various parameters (P0 to P6). Pressing the 'SET' button whilst any of there parametersare displayed will allow you to change the value for that parameter using the '+' and '-' buttons (seebelow). When finished setting a parameter press the set button to exit that option. If no buttons arepressed for approximately 5 seconds the thermostat will exit the parameter options and will returnback to the default temperature display.3. Setting the cooling or heating parameter P0:The parameter P0 has two settings, C and H. When set to C (default) the relay will energise when thetemperature is reached. Use this setting if connecting to an air-conditioning system. When set to Hthe relay will de-energise when the temperature is reached. Use this setting if controlling a heatingdevice.4. Setting the hysteresis parameter P1:This sets how much change in temperature must occur before the relay will change state. Forexample if set to the default 2oC and the the trigger temperature has been set to 25oC, it will not deenergiseuntil the temperature falls back below below 23oC. Setting this hysteresis helps stop thethermostat from continually triggering when the temperature drifts around the trip temperature.5. Setting the upper limit of the thermostat parameter P2:This parameter limits the maximum trigger temperature that can be set. It can be used as a safety tostop an excessively high trigger temperature from accidentally being set by the user.6. Setting the lower limit of the thermostat parameter P3:This parameter limits the minimum trigger temperature that can be set. It can be used as a safety tostop an excessively low trigger temperature from accidentally being set by the user.7. Setting temperature offset correction parameter P4:Should you find there is a difference between the displayed temperature and the actual temperature(for instance if the temperature probe is on a long run of cable) you can make minor corrections tothe temperature reading with this parameter.8. Setting the trigger delay parameter P5:This parameter allows for delaying switching of the relay when the trigger temperature has bereached. The parameter can be set in one minute increments up to a maximum of 10 minutes.9. Setting the high temperature alarm parameter P6:Setting a value for this parameter will cause the relay to switch off when the the temperaturereaches this setting. The seven segment display will also show '---' to indicate an alarm condition. Therelay will not re-energise until the temperature falls below this value. The default setting is OFF.
V**
Take a 2amps adopter
It is working good
N**H
Very bad product
The media could not be loaded. As you can all see buld is off yet the bulb indicator red loght is on and temperature is dropping continuously even though I have set it to 33°c very poor quality product and this is my second order 1st one was also defective
A**E
The sensor wire did not last long
I got it for my aquarium temperature monitoring. Unfortunately the sensor wire went bad and started giving wrong reading. It is supposed to be a temperature sensitive resistor not sure how it can go bad so quick. May be the seal went bad and water went in. Overall in 2 months the sensor wire was dead. I will have to pay 150 to get another one..
C**T
Works as describe
The media could not be loaded. To get the instrument up is a hassle however once you get the hang of it and set things up it works link what you expected it to do.... I'm real happy with this.....
R**A
Ek hi din bhi nahin chala kharab ho gaya
Ek din mein hi kharab ho gaya waste
A**Y
Easy to use
It is very easy to use...all the functions are pre set