We remain fully operational. Our teams are working around the clock to ensure your deliveries continue safely.

下载应用程序


⚙️ Sharpen smarter, not harder — precision rest for pros who demand perfection!
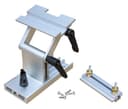
The Taytools Bench Grinder Replacement Sharpening Tool Rest Jig is a robust, anodized aluminum accessory designed for 6” and 8” grinders and belt sanders. It offers precise multi-directional adjustments including 3” forward/back, 2” up/down, and 170° rotation, plus a quick-release feature for freehand grinding. Its grinding jig supports blades up to 2.5” wide, making it an essential upgrade for professionals seeking accuracy and durability.
| Material | Aluminum |
| Brand | Taytools |
| Color | Silver |
| Product Dimensions | 7.1"L x 5.1"W x 3.7"H |
| Item Weight | 1.5 Pounds |
| Grit Type | Coarse/Medium/Fine |
| Number of Items | 1 |
| Manufacturer | Taylor Toolworks |
| UPC | 791617730014 |
| Part Number | BG |
| Item Weight | 1.5 pounds |
| Item model number | BG |
| Is Discontinued By Manufacturer | No |
| Power Source | Manual |
| Batteries Included? | No |
| Batteries Required? | No |
J**L
Well made, just right, very adjustable
The aluminum is well finished with all edges ground very flat, square, and uniform. The finish is uniform and well anodized. My unit suffered a little in shipping but just cosmetic surface dings.The locking mechanism worked well for me and the handles can be rotated easily for clearance. The unit is very adjustable and able to be positioned in a wide range of positions. If needed the unit can be mounted on a wood block, and you can easily reach any desired height.This represents a great value compared to other similar jigs, such as the Veritas brand jig.
A**R
Good value for small shops.
I really like the design. It's simple but flexible for various sharpening jobs. The construction is plenty sturdy for small shops and for chisels or planer blades. It is easily adjustable, but it may take some time to get it right because there are so many areas to deal with.... horizontal, vertical, table tilt, how far the tool protrudes from the clamp. With practice it gets easier. I would like an angle gauge to indicate table tilt, and I found that I had to very forcefully tighten the locking levers to hold my settings during use. That said, I find this tool to be a very good value for the money. Competing systems can cost 3-4 X what this one cost. Even with the fine 120 grit wheel, I do my final honing on a diamond coated bar to get a smooth, sharp cutting edge.
D**E
The missing piece of my sharpening system
The media could not be loaded. I am terrible at sharpening chisels. To the point where once my chisels get really beat up I will often give up and buy new ones because I messed them up fairly badly. I thought buying a grinder would improve things but I often mangled them because the tool rest was garbage. I bought this and it all came together. I was able to take a really beat up chisel and get it to have a mirror's edge. I took photos of the process as well as a video showing how I used the tool rest. Now I am slightly less terrible, but have working chisels again!I added a ton of photos of the process but you can't add captions so this is the gist of it:Video: Showing how you use the jig. I grind it, cool the blade with water which is just off camera, repeat. I check progress as I go because this chisel was really beat up and was initially ground crooked.Photo 1: The beat up chisel I am fixing. It's in rough shape and even has some adhesive stuck to the blade.Photo 2: Squaring up the chisel in the holder using a speed squarePhoto 3: The grinder with the tool rest installed. I put a 3/4" thick board between the grinder and the tablePhoto 4: You can see you you can change the blade angle and distance to accommodate a wide variety of chisels. I eyeballed the angle as it's a little tricky to figure out since you can move the tool in so many directions and distances from the wheel.Photo 5: This board is a bit short. I'll reseat it later and extend it a few inches. It still works just fine so I am not in a rush.Photo 6: End result. Not perfect, but good enough!Photo 7: You can see the hollow grind here.Photo 8: Finding the angle to see how I did. I was off and it's 20 degrees instead of 25. Good enough for my needs and if I have issues I can fix it later.Photo 9: Honing time! I use DMT 8-Inch Dia-Sharp Continuous diamond stones in an extra course to set the bevel, then move onto fine and extra extra fine. My extra course stone is fairly worn so its closer to a course now. Above I have various sheets of sandpaper glued to a 12x12 granite tile with spray adhesive. The tile itself is glued to an old piece of plywood with a couple of shims on the side to help keep it in place. Lubricant is water with a drop of dish soap in a spray bottle.Photo 10: Setting the angle for the sharpening jig.Photo 11-12: I am terrible at freehand and this jig cost $16. Its not as nice as the fancy expensive ones but its better than freehand and does the job https://www.amazon.com/WoodRiver-Honing-Guide/dp/B0035Y439CPhoto 13-14: The initial bevel off of the coarse diamond stone. You can see the wire at the top and it's wavy because the grind is uneven. That is on the operator. I was going for close enough and hopefully I will improve with practice.Photo 15: This is after the fine diamond stonePhoto 16: This is after the extra extra fine diamond stone. It's already very sharp.Photo 17-19: Going through finer and finer grits of sandpaper. I started at 1200 grit and ended at 7000 grit polishing paper. I don't think I got it on Amazon as its not in my order history, but Amazon ultrafine polishing paper.Photo 20: Finished! It is ultra sharp and down to a mirrors edge. Literally! Check out the reflection of the pencil in the bevel.I hope this was helpful, I wanted to show you how this jig fit into the sharpening process because for me it really was the missing piece to being able to effective sharpen my chisels and hand planes.
L**1
Nice but doesn't fit my grinder set up
The slot in the platform is too small for a CBN wheel. To mount this on my portable grinding station set up for the Wolverine system would take more work than it's worth. The lockdown handles are too low and hit the bottom before tightening. I would have make it higher to work. Not for me. well made though.
L**Y
Tool rest
Excellent. Worked great. Going to buy another one for other side of grinder.
D**A
Excellent Tool Rest
I received this tool rest in A1 condition and well packed. It's well-made and finished very nicely; all the parts operate smoothly and the thumb screw and lever locks stay tight during grinding. I've used it about a dozen times so far and it seems to work very well. The tool holder slides smoothly and gives me very good control of the angle on my chisels. Remove the rudimentary tool rest that came with your grinder and use this rest exclusively.
J**D
Basically a beta test of a promising product
I have very mixed feelings here. The concept is great, but the execution is not.Problem #1: The design directs a lot of leverage onto the lower cam, so a stiff breeze can blow it out of place. It needs to be an angle bracket with two rods through the track. There is plenty of angle adjustment at the top bracket; the bottom one doesn't need to swivel as well. I'm going to try to modify the existing bracket in order to give it a better grip.Problem #2: The thumbscrew for the lower track is basically on the wrong side. You can see in one of the example photos even that they had to flip it around backwards in order to position the chisel for the photo. You'll probably end up screwing this down to a board to that you can easily move the rest and fix it in place as needed. The extra height will mean lowering the bottom cam position basically as far as it goes in order to put the rest around the midpoint of the abrasive wheel on an 8in grinder. At that height, you can't lower the angle of the rest beyond about 50 degrees without the tang of a chisel hitting the thumbscrew. If you have a thicker handle and a short blade it's even worse. In order to fix this, you need to take out the first cam and turn the rest around so that the thumbscrew is wheel-side. Unfortunately this means you need to turn the grinder off in order to safely access the thumbscrew for adjustment.Problem #3: The provided screws are made of extremely soft metal. Two of them stripped out on me despite being as careful as I could and pre-drilling pilot holes. I had to cut a straight slot with a file in order to complete screwing them down.This feels like a product that was designed, built and shipped, but never actually tested at all.
TrustPilot
2 周前
5天前