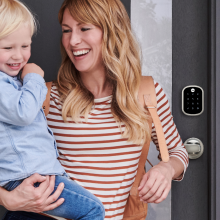
🔒 Upgrade your lock, upgrade your lifestyle—smart security that keeps you connected and in control.
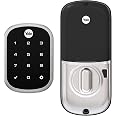
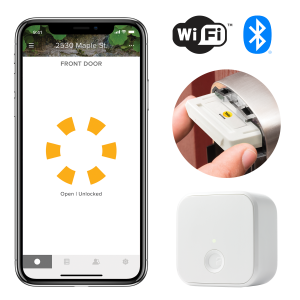
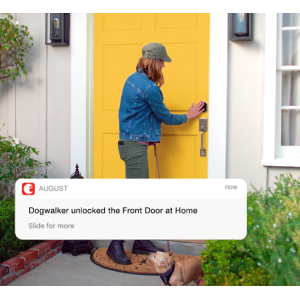
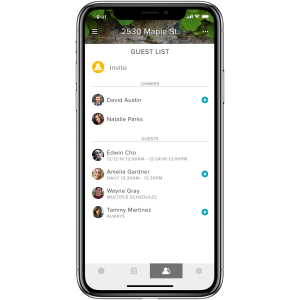
The Yale Security Wi-Fi and Bluetooth Upgrade Kit transforms first-generation Yale Assure Locks and Levers into smart, app-controlled devices with seamless Wi-Fi connectivity, voice assistant compatibility, and advanced security features like DoorSense and biometric verification. Designed for easy installation without additional hubs, it ensures remote access, real-time monitoring, and enhanced peace of mind for modern homes.


| Brand | Yale |
| Special Feature | Works with any Yale Assure Lock or Lever |
| Lock Type | Biometric, Keypad |
| Item dimensions L x W x H | 4 x 2 x 4 inches |
| Material | Plastic |
| Recommended Uses For Product | Security |
| Style | Wi-Fi and Bluetooth |
| Color | White |
| Number of Pieces | 1 |
| Finish Type | NA, N/A |
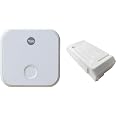
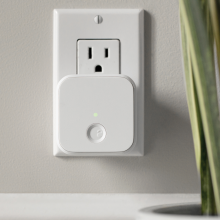
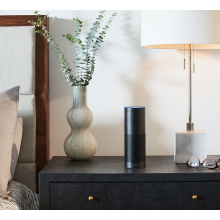
| Included Components | Upgrade kit including necessary components to upgrade a first generation Yale Assure Lock or Lever work with the Access App and Wi-Fi Connect, plus Connect Bridge |
| Controller Type | Amazon Echo, Vera, Apple HomeKit, Google Assistant |
| Control Method | Voice |
| Connectivity Protocol | Wi-Fi, Z-Wave |
| UPC | 081023044622 |
| Model Name | Yale WiFi and Bluetooth Kit For Assure Locks |
| Global Trade Identification Number | 00081023044622 |
| Manufacturer | Yale Security Inc. |
| Part Number | AYR202-CBA-KIT |
| Item Weight | 7.4 ounces |
| Product Dimensions | 4 x 2 x 4 inches |
| Country of Origin | China |
| Item model number | AYR202-CBA-KIT |
| Size | 1 Pack |
| Finish | NA, N/A |
| Pattern | Kit |
| Power Source | AC |
| Item Package Quantity | 1 |
| Special Features | Works with any Yale Assure Lock or Lever |
| Batteries Included? | No |
| Batteries Required? | No |
| Warranty Description | 1 Year electronic warranty |
I**F
Easy Upgrade, Great Performance
The Yale Wi-Fi and Bluetooth Upgrade Kit has made my first-gen Assure Lock even more convenient and modern. The upgrade was simple to install, and it immediately added Wi-Fi and Bluetooth functionality to my existing lock, allowing me to control it remotely from my phone or other smart devices.I love the added convenience of being able to lock and unlock my door from anywhere, and the Bluetooth feature makes it easy to unlock when I’m nearby without using a key or code. It also works seamlessly with my smart home setup, giving me complete control over my security.The only thing to note is that this upgrade is not compatible with the Yale Assure Lock 2, so be sure to double-check your lock model before purchasing. Otherwise, the kit is well worth the investment, adding great features without needing to replace the whole lock.This product offers great value for money, excellent functionality, and is easy to use. If you’re looking to upgrade your first-gen Yale Assure Lock to a smart, Wi-Fi-enabled lock, I highly recommend this Yale Upgrade Kit! Highly recommend!
C**D
Works with YRC226 interconnected lock
The media could not be loaded. I had an existing interconnected lockset, and wanted to keep that arrangement but get a keypad lock and hopefully a smart lock as well. The only model that seemed to meet my needs was the YRC226 interconnected lock, and it is hard to find this lockset as it is not really sold through consumer channels. The YRC model documentation is also really unclear on whether or not the interconnected models have the same network module compatibility as the standalone deadbolt (YRD) models and even the Connected by August compatibility list doesn't include the YRC models. (It would make sense that they work though, as from what I can tell, the interconnected models are the YRD deadbolt paired with an handleset, only the mechanical bits are different to pop open the deadbolt when you turn the handle, but ASSA ABLOY didn't want to confirm for me that network modules were compatible with the YRC models!) I was able to buy a YRC226 lock which came with a Z-Wave module, but I did not install it when installing the lock, and decided to try the Connected by August module instead. I had some hope as the install guide had directions for the Z-Wave, Zigbee, and iM1 modules, so I would have been really shocked if the Connected by August module *didn't* work.The good news is - it works! Remember to remove a battery before installing to avoid possibly shorting out the lock or module. I referred to the lock install directions, and after replacing the battery, while I tried to follow the directions for enabling the network module using the keypad, the "join" option was unavailable, just "forget", so it seems the module set itself up and didn't require any extra steps to enable it on the lock. Setting everything up in the August app was rather easy, the firmware updated quickly, although the bridge setup was annoying as the closest outlet to the door (about 7 feet) still has a rather weak Bluetooth signal and I had to move the bridge around to find the optimum location for it.Adding the lock to HomeKit failed at first, but worked after restarting my iPhone. Setup in the Alexa app was also very easy. I don't use Google Home, so I can't share any experiences with that. I also setup DoorSense while setting up the lock - since my door frame is metal, I mounted it externally, as you can see in my video. Right now auto-unlock isn't something I'll probably get to try, but these are software, not hardware, and the hardware seems to have been really easy to install and configure, and I'm pretty happy with the features that this module unlocked.
D**
Issue pairing? Here's the definitive guide!
Like many, I initially struggled with getting this kit to pair with anything-- phone, Wi-Fi, etc. Keep reading for the definitive guide!Overview: August vs. YaleAugust was an early smart lock company that was purchased by Yale. Through that transition, August Connect became Yale Assist. Both apps look identical to me, and connected products SHOULD work in either environment. If you're new to the ecosystem, I recommend using the newer Yale branded experience (at some point I'd assume Yale would deprecate the August experience). In my case, I already had August devices and my family members were on the August app, so we stuck with the August ecosystem for now.Smart Module & BridgeThis kit comes with two key pieces... the Smart Module that you install into your supported Yale Assure lock, and the white Bridge, which must be plugged into a nearby electrical outlet in order to "bridge" from the lock's Bluetooth lock to your network's Wi-Fi. There is also a small door sensor, but that is optional so will not be covered here as it's easy to setup once your lock is connected. The product images for this item show pictures of the WHITE August module, HOWEVER what you will receive is the BLACK Yale Assist module. So what is the difference? The older WHITE August branded module is Bluetooth-based and requires the Bridge to function. The newer BLACK Yale branded module adds native Wi-Fi, so the Bridge is not required - but likely recommended for most due to two key drawbacks of using the BLACK module's native Wi-Fi without the bridge: 1) some users report shorter battery life when using the BLACK module in direct Wi-Fi mode (bypassing the Bridge). 2) if you intend to use HomeKit, you must use the Bridge- due to security reasons, Apple does not support native Wi-Fi locks as of this writing.Getting ConnectedHere's where many, including me, got stuck. This system has the ability to scan a QR code into the Yale or August app. In theory, this should be the preferred way as it avoids lots of typing of long codes. In practice, it does not work and should be avoided in favor of the manual way.Detailed steps below:The Lock1. Install Smart Module. Remove batteries from your lock and install smart module as instructed- it is a simple slide into place with a very slight click. I recommend you take a picture of the serial number at this time as you'll need it later.2. Factory Reset Lock. You will also likely need to factory reset your lock- which will wipe out all settings on this lock if you have any. For Assure, the factory reset is done via a white button behind the main lock assembly. This is a pain to get to and requires the lock to be powered, so you'll have the battery assembly handing off the lock while still wired to the touchpad, your smart module is installed at this point, and you'll need to temporarily install the batteries to it. You can find details from Yale's on how to do this (Amazon blocked my original review for putting a link to that page).3. (re)Set Master PIN. You'll know you got the reset right if when you power up the lock you are asked to enter a Master PIN. This your main 'admin' access to the lock, so make sure it's a number you can remember. After you enter the Master PIN, the lock will perform a quick test of locking the bolt before it's all ready.4. Enable Wireless. Once you have installed the Smart Module, Factory Reset the lock, and set up your Master PIN, you can now reinstall everything on the lock. Once that is complete you can enable Wireless on the lock. Enter your Master PIN and press the Gear icon to enter the menu. Select option 7, which should be Wireless, then press the Gear to confirm. Select option 1, which should be enable wireless, then press the Gear to confirm. Press the back button to exit or wait for the timeout.The BridgeThis needs to be installed close enough to the lock to have good communication, and also close enough to your Wi-Fi router/access. Before installing, I recommend you take a picture of the serial number on the back as you'll need it later. Installing this is super-easy, but I do recommend factory resetting it at the start. Press and hold the front button, and while still holding the button, plug it into your outlet and keep holding the button for about 10 seconds. You should see the LED flash red. Release the button then you should get a couple green LED blinks then a slow green blink meaning it's ready for pairing. Again, while the bridge is not required for basic operation on the newer BLACK smart module... it's still recommended for longer battery life, and required if you're planning to use HomeKit.Let's Get ConnectedNow that your lock and bridge are installed, let's get things connected.1. QR codes-- don't use them! Yes, scanning these as instructed would be super easy and should work. But in my experience it did not-- at all. Skip the QR route and save yourself lots of headache.2. Download the app. If you're new to the ecosystem the Yale Assist is recommended. If you're already using August then you can stick with that, or switch over. As of this writing the apps appear to be the same. Open your app and set up an account and location, if you don't already have one.3. Get your serial numbers handy. Hopefully you took pics as noted above, if not they can be found on the outside of the small box for the Smart Module (or on the front of the module itself behind the battery door), and on the back of the Bridge (you have to unplug it to access).4. Setting things up in the app. Note: you must pair the Lock and the Bridge separately.4a. Pairing the Lock. In the app main menu, select "Set up a Device". Do NOT use the QR code, instead select Enter Serial Number Manually, then select Use Product Locator. Select "Yale", then "Yale Smart Module", then "Yale Access Upgrade Kit (CBA)". Then go through the steps to pair your Lock. Once this is complete, repeat the process to add the Bridge.4b. Pairing the Bridge. In the app main menu, select "Set up a Device". Do NOT use the QR code, instead select Enter Serial Number Manually, then select Use Product Locator. Select "Yale" or "August", then "Accessory", then "Connect Wi-Fi Bridge (AC-R1)". Then go through the steps to pair your Bridge.At this point, you should be all set in the app and have avoided tons of frustration!!
TrustPilot
1 个月前
2 个月前